Pages

Friday, 30 January 2015

Steampunked Clock Tutorial

 Hello there
Welcome to my photo tutorial of how I turned this cheap kids find...
into this!  and yes...it still works!
My inspiration was this clock which I found on Pinterest.  It is created by Heather Jacob  and if you click on her name you will go to her blog where you can see the original.
Altered Rustic Clock
 First I took the whole thing apart.  All I needed was a screwdriver and this is what I got:
 I covered it in a decent coat of Heavy Gesso for "tooth"
 Then I added some Vintage photo Distress paint over some gold crackle texture paste by Finnabair.
 I got carried away by the moment of playing with the paint, so there are no step out shots of how I got here, sorry!

I used Finn's platinum crackle texture paste on the clock face and when it was dry, I rubbed Vintage photo Distress paint over it to get into the cracks.
Then I added thick bits of Finn's gold texture crackle paste as well as some Glossy accents and some micro beads to the clock body for shine and texture.
 On top of all of this I added a thick layer of Finn's clear texture crackle paste in random places and let it dry. 
 When it was dry I dripped brown alcohol inks onto it so that it would flow into the cracks.
This is the glass face with the clear crackle texture paste on it filled with ginger alcohol ink.
Having done all of that, I decided it needed some Steampunking and glitter so I could enter it into Finnabair's "Sparkle and Shine" challenge!!!
I found some yummy glitter numbers in my sticker stash and glued them on top of the metal embellishment which I filled with Glossy accents.

I glued some 4.5mm eyelets upside down onto the side of the clock and when they had dried I added pieces of leather thong and glued them in place too.   Nothing like some "high tech" painter's tape to hold it in place while it dried!
Then it was time to put the whole thing back together!

 Woops...I saw in this photo that the inside of the "bell" was still pink, so I took them off and added black distress paint! Phew!
I am also entering this into Sandee and Amelie's Steampunk Challenge where you have to do something with a 3...in this case the time on this clock is 3 o'clock (or rather it was when I started setting up the shot...)as Mario, Tim Holtz's logistics director always has coffee at 3!


Hope you enjoyed that!


Wednesday, 28 January 2015

What's on My workdesk 295? Clock parts

Hello fellow Desker from Julia's place.  I am busy with a clock which I am giving a make over!
It was a sale clock from a furniture store in the kids department.  The "art" ones you can buy are SO EXPENSIVE here and anyway, I have not seen one for a while to purchase in a store.

It started off bright pink...which would normally suit me as I have BRIGHT pink hair...and love the colour, but it needed some toning down and I have just purchased my first few jars of Finnabair paint...you can see them at the back of my desk.  So you see I needed a project to try them out on.  This gesso is amazing stuff, it stuck to the plastic so well as a base.  From there I used distress paint and now her crackle paste.
It is still a work in progress.  Not really sure where it is going yet...

Tuesday, 13 January 2015

WOYWW 293? Insight into how I work on a Project


Hello fellow Desker from Julia's place.  Welcome to my Desk over in sunny Cape Town, South Africa!

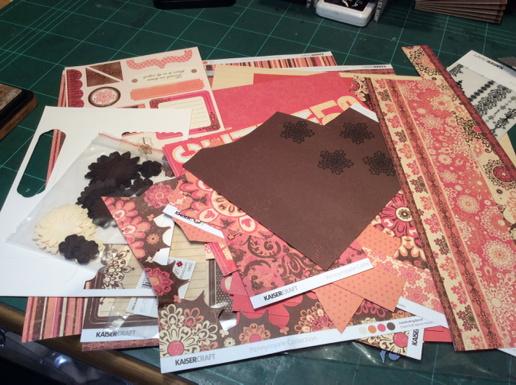
I have been on leave for a while, (nearly a month!) but have only managed to spend 2 days so far at my desk creating!  I decided to work my way through a box of leftovers from Conventions that I have attended over the years.  I say years...meaning at least 10 years!  I have always finished the convention projects, but then I would put all the off cuts and left over stickers in a box.  The papers were too pretty to throw away or give away, but I never got round to doing anything with them.

I challenged myself to using up all the bits on either cards or making scrapbook layouts if there was enough large pieces left.  The top photo shows all the various piles I had to work through! (I have done 4 of them so far!)

My process works as follows:

First I pick a pile of papers from one kit.
Embedded image permalink
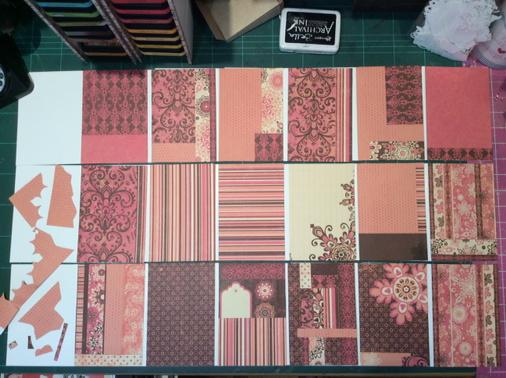
If I am doing cards then I jigsaw the bits of paper together to make a card base and I see how many card bases I can get out of the pile of left overs.  This does not take me long at all.  All that is left of the pile above is the few pieces on the left of the photo below!
Embedded image permalink
Then I set about using the matching stickers or embellishments to decorate the cards.  If there are none, then I die cut some paper using pretty dies.  The decorating takes me hours!  It looks so simple...yet...

From this lot I have 3 sets of cards to give as gifts for friends birthdays.  I make a nice little folder to hold both the cards and envelopes for storage.  These are always so appreciated by the receiver!

Wednesday, 7 January 2015

What's on My Workdesk Wednesday 292? Buck!

I am late to the desk party cos I have just arrived home from a 5 day stay with my family up the West Coast.

Last week I showed you a pic of me floating down a river.  This week I show you the cutest furry friends I made!

3 Months ago this guy was 3 weeks old and looked like this.
Now he has beautiful horns which will sill triple in length and he will double in height.  For now he is able to walk in and out the house, but soon he wont get his big self in the door!
His name is Tipsy cos he was rescued by my brother in law who works with wildlife and saw the mother in distress so did an emergency cezer which meant that the little buck could not stand for the first few days as they usually drop and run with natural birth...so he wobbled about and got himself the name of Tipsy.  Apart from eating the natural vegetation, he is still taking 3x 500ml bottles of milk in the morning and evening.  Check out his eye lashes...
Then meet Bambi.  The latest addition to the hand reared lot.  She is a Steenbokkie. (Stone buck) She loves a cuddle if she can get one.
 Here is Tipsy sneaking in my bedroom door this morning from the patio! 
Still no artwork to show you...maybe next week when life is back to normal...such as what is normal?