This is a photo heavy post, so get comfy if you have the time. Although I cannot tell you all the details on how I made this worn journal cover, I can show and tell the extra bits which I did to add to my project that are not in Tim's book on Page 35! Go to Linda's blog to see more ideas by the Curiosity Crew for inspiration.
I started with a brand new Cover.
This is the buckle closed, as if the cover was full inside. I am still working on the contents!
I started with a brand new Cover.
Covered it with Gel medium
Then adhered a sheet of gift wrap tissue paper which I had scrunched up.
When the front was dry, I glued the inside and wrapped the paper round the cover.
Now I had a textured cover, inside and out!
I started on the front cover with distress paint and water which takes an age to dry, but I prefer it to air dry than help it with a heat gun as it seems to dry more interesting when left to its own devices!
You can see how much paler it dries below!
Once this was dry, I had run out of patience so I did the inside with a thin layer of paint and blended it with a baby wipe. This showed up the wrinkles nicely.
Once this was dry (which was quick!) I lightly smeared some bronze paint dabber onto the raised areas of tissue paper around the edge of the cover, inside and out.
Then I set about making the decorations for the cover and shopped my stash for trinkets.
I added distress embossing powder to the clock die to make it look rusted.
Here you can see how I plotted my layout before adding my stencils.
I discovered a great thing about this stencil, if you stencil it straight first, you can angle it the second time and get a full second clock at the top!
as per below!
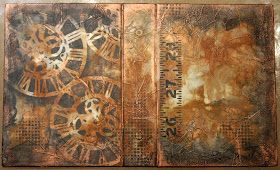
This is the finished base for the front of my cover.
The inside looked like this before I added the cut off piece of clock die.
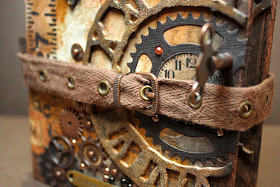
I used a brad though my ribbon, the buckle and the clock die to anchor it all in place.
This is how it looks from the top
The clock face from the remnant rub fitted perfectly inside this Spellbinders cog die.
For extra texture I added some flat backed pearls.
The safety pin on the spine acts as an anchor for the excess ribbon once it is buckled up.
The Antique bronze distress paint that I added to the metal cogs and word strip look almost gold in these photos, but they are quite copper in real life!
I added the off cut from the front clock to the inside cover of the back page.
Tim's buckle is such a clever piece of idea-ology. Functional and good looking!
So this is my cover, inside and out.
If you want to join in this challenge, get yourself a copy of the Compendium of Curiosities 3 and go to page 35. This is an odd numbered challenge, so the sponsor for the lucky draw prize is Inspiration Emporium who are giving a generous $50 voucher! Tim and Mario sponsor an awesome selection of goodies as the prize for the person's project chosen by the Curiosity Crew. To be eligible for this prize, you have to comment on every Curiosity Crews members inspirational piece and stick to the few rules Linda stipulates....


I really like this! It appears as if the diecuts are actually molded parts of the cover. And the cut puece fits perfectly into the rays stencil. Wow!
ReplyDeleteBeautifully done Bella. What a wonderful treasure.
ReplyDeleteFabulous, Belinda! I would love to be able to hold this and inspect it at leisure. I just love all the gears and clocks and your brilliant use of Ideology!
ReplyDeleteIt's wonderful, and I am sure the contents will be as well.
ReplyDeleteIt looks so beautiful. Love the covers. So much texture and I love the rich colours
ReplyDeleteYour backgrounds are always so cool and this book is so beautiful! Love the colors! It's perfect! I want your book!!! I love it!
ReplyDeleteYou are a creative Genius Belinda, this is so beautiful, perfect in every detail. Love it!! Anne x
ReplyDeleteVery very nice! Lots of lovely details and brilliant colour tones. Love it.
ReplyDeleteOne word - FANTASTIC!
ReplyDeleteWOW I love your altered worn cover, it's fabulous. So much to see and wish I could touch it.
ReplyDeleteThanks for your sweet comment on my CC3C win. It means even more after seeing how incredibly talented you are. xx
Wow! All the detail and techniques that went into the making of this cover are awesome! I'm with everyone else - would love to hold it in my hands and really inspect it up close! Amazing job!
ReplyDeleteDELICIOUS! It's the first word that comes to mind, because I find this grungy distress and steampunky-ness to be simply delicious for the eyes. Fantastic!!
ReplyDeleteAnnette I feel the same way about distress and steampunk.
DeleteIvette
Wow, this is fabulous !
ReplyDeleteCorrie x
Belinda...another beautiful work of art from you! I always look forward to seeing your entries because they are always so beautifully done. There is so much depth to these covers. I love the thin tissue paper beginning, covered in those earthy colors. The stenciling of and the recurring theme of the weathered clock is "wicked". Beautifully done. The gears continue the clock theme and really fill up the exterior covers with such great dimension and detail. Love the strap, too! Your Ideaology pieces are such a great companion to your already fab cover. Thanks for sharing your art with all of us at CC3C. <3 Candy
ReplyDeleteA complete total overhaul!!! LOVE the texture, the grunge, the grit, the steam punk feel!!! Just a fabulous alteration!!! Thanks so much for joining us on the Worn Cover Challenge at CC3Challenge!!!
ReplyDeleteWow, Belinda this is amazing! I love all of the cogs and gears that you've used on your worn cover!
ReplyDeleteFabulous worn cover Belinda!! Love all that wonderful texture and the clocks everywhere. Karen.x
ReplyDeleteLove all the textures, gears and clocks! Very
ReplyDeletecool worn cover!
Girrrrrrlllllllllllll..... you are the Queen of Gears! This album ROCKS in every way imaginable. Love it! Off to pin to savor another day. Thanks for sharing with us at CC3C!
ReplyDeleteWOW! This is beautifully brimming over with lushiousness. Well done you.
ReplyDeleteHugs
xx
Wow Belinda, this is amazing! You have inspired me to make one, I really like how you used the buckles. x
ReplyDeleteI had to pop back by and take another look at this. I sure hope you win Belinda, this is divine! xx
ReplyDeleteThis is incredible!! Awesome job
ReplyDeleteSaw this on Pinterest and had to come to take a closer look at your fabulous project! I hope you win the challenge!
ReplyDeleteThanks so much for the photos and explanation of how this came together!
Thank you for visiting my blog and for taking the time to leave me a comment, I really appreciate that.
DeleteI too just saw this on pinterest & had to pop over to tell you I think it is fabulous!!
ReplyDeleteI have some old hardbound catalogue covers which I want to cover & turn into magazine holders so your covering techniques & paint drying problems are extremely useful pieces of information for me. So thank you for sharing.
Thank you for visiting my blog and for taking the time to leave me a comment, I really appreciate that. You are welcome to email me if you need any more information when you are doing your book covers.
DeleteWow...this is amazing. I love all the bits and pieces. Beautiful! Thanks for sharing with us at CC3C!
ReplyDeleteStratospherically incredible Belinda! You have completely nailed this inside and out. Jenny x
ReplyDeleteCongratulations Belinda ! You are an awesomely talented lady!!!! I love the way you have transformed your cover inside and out! Xx
ReplyDeleteWell done Belinda, great project well deserved win at CC3C. See you tomorrow (woyww), Angela x
ReplyDeleteWow, this is like the Full Monty! You really went to town on this project. It looks amazing!
ReplyDeleteAmazing style! Love the vintage, steampunk look to it. congratulations!
ReplyDeleteI am so glad I have come across this work of art on Pinterest!!! Your work is amazing! I am your new follower :) This type of art is out of my comfort zone but I sure would love to expand my horizons. Thank you for the inspiration :)
ReplyDeleteSaw this on Pinterest and just HAD to see all the nooks and crannies! Just gorgeous!
ReplyDeleteBelinda, your work is amazing and gorgeous! WOW! Thx for sharing it.
ReplyDeleteit's all perfect, deftly a winner to me.
Ivette
Thank you, thank you so much for sharing this. I am just getting into making journals, diaries etc and you are an inspiration.
ReplyDeleteIt was great seeing some ideas that I had formulating are very do-able.
Cheers
Lynn
Amazing. I love it.
ReplyDeleteLove this and the beautiful colors.
ReplyDeleteVery nice. An inspiration.
ReplyDeleteNow this is what I call..... GIVING US DIRECTION!!!! Thank you so much! Beautifully done, beautifully written, easy to follow. EXCELLENT TUTORIAL. LOVE ALL OF IT.
ReplyDeleteThis is absolutely beautiful! I know someone having a Steampunk themed Wedding. She is doing her own DIY and Everything is Super Cool! This would be a beautiful cover to a Journal/Wedding Memoir Book beginning from all her plans, finished projects and photos. I will let her know about your site! Fabulous work! Thanks for sharing.
ReplyDeleteI saved this a few times and still admiring your work. Learning this and want to learn more from you.
ReplyDeleteWow, I love it !
ReplyDeleteSimplemente espectacular como obtener un tesorero de estos me encantaría
ReplyDelete