Wednesday, 10 August 2016

Creative Chemistry examples from Day 4 Distress Crayons

Dear Blogger, I know you are being overloaded with posts from me right now... it is all feast or famine around here I tell you!

I have watched all the videos from Creative Chemistry 103 by Tim Holtz and have lapped up every minute.

Why do these classes feel like they were over in a flash.  Somehow my school days seemed to drag...  Clearly they were not creative enough!

I had a little time at my desk yesterday morning as it was a public holiday here to celebrate Women's day.

I moved between the canvas I have already posted and these 6 samples from the Distress Crayon day.


In no particular order here they are:

Distress Crayon Layered Colouring
Distress Crayon Smudge

Distress Crayon Watercolour Resist

Distress Crayon Gesso Fresco
Distress Crayon Blended background
Distress Crayon Textured Resist.

Steam Restaurant part 11 " The clock room"

This room originally had lots of mirrors on the wall.  The painters removed all the nails so I had a blank "canvas" to work with...
My idea was to put pipe work between the mirrors which you see in these before photos above and below.
The owner had asked me to make cogs to go on the ceiling, so I did!
Then the idea of making it "the clock room" came about and I made a half a giant clock to go up against the ceiling.
I used two sheets of foam core to cut 1/4 circles out of and butted them up together.  Sprayed them copper and added the stamp work.  I cut the numbers and the clock hands from the left over foam core and painted them black.

I then added my fake rust round the edges of the clock.
Here it is at the start of the wall
Then I added the mirrors back as well as some pipe work
I decided to combine the cogs on the ceiling and the stamp work I had done on the clock, almost as though the clock is "exploding" onto the ceiling.
Finally I added stamp work around the mirror on the far wall to integrate it into the rest of the room.
I had found the telephone clock at a local interior decor store and added cogs to the numbers as well as the airplane clock to which I added the giant cog. 

Tuesday, 9 August 2016

Creative Chemistry 103 Canvas


Ok, so Tim says in the last class that we should challenge ourselves to take a technique and tweak it or use it on a different surface...

Well, I took a whole lot of techniques and used them all on a canvas!

I combined distress crayon smudge, distress crayon blended background, distress layered collage, texture paste coloring and texture paste embossing all together!

This tried my patience on every level cos it has to dry naturally at times and even though the sun was shining, it took a few days to construct the base layers...

I did however take a feather out of Tim's cap and just went with the flow... I had no real plan and just played.

It was so nourishing for the soul.

Thanks to Tim for all the information he packs into his classes, I always come away feeling uplifted and excited to try the new techniques.  I wish school had been this much fun!

Steam Restaurant part 10 "Library room exposed brick wall"

Having made the diving bell and gotten the electronic board, I found a kids water squirting back pack which looked like mini air tanks.  I took them apart and spray painted them copper!


This is what my back yard had going on in it on any given day when the sun shon!
Below is the diving board


Again, the plan I had laid out in my car port above, had to be changed on the job as the big fire hydrant handles could not be accommodated by the fragile wall as well as the two tall items which I wanted for dimension to come out of the wall.  I replaced them with some more gauges.
Here is the whole exposed brick story.  The sign on the wall says "Notice to all diving bell users, please leave your personal belongings on the hooks provided"

  I attached these to the electronic diving board and piped it round to where the diving bell sits high up on the library shelf.
The rest of the wall is pipework and fake gauges as well as three hooks for the divers hat, goggles and ray gun.  The three hooters were meant for kids bikes, I just thought they were quite fun all in a row like this.  They were of course a gazillion shades of brightly coloured plastic all spray painted copper.

Monday, 8 August 2016

Steam Restaurant part 9 "Diving Bell"

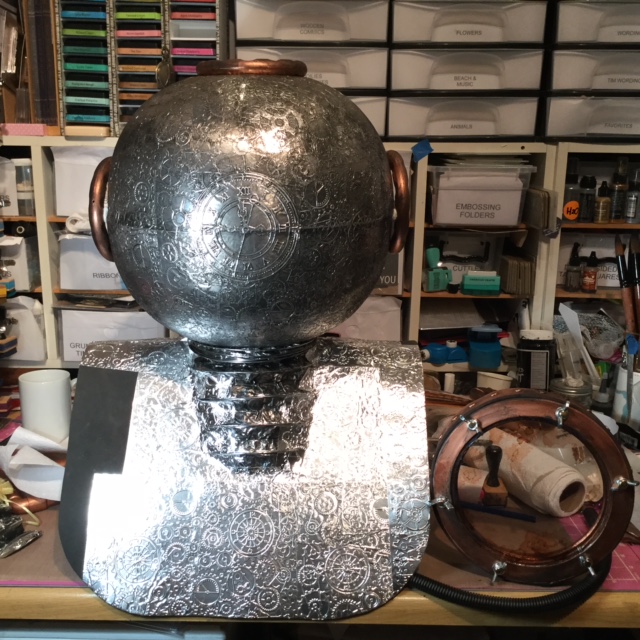
While doing my usual trawl of Pinterest, I came across a diving bell image and decided it would be fun to make one too.
I got two punch bowls, some air conditioning ducting and a kids ring toss game as well as a huge funnel to use as my base.
I glued the two bowls together and covered them with embossed sticky backed foil and distressed it with black paint.
I then added the game rings which had been sprayed copper together with some Console Jam jar lids for the windows.

I then made him a collar with some foam sheeting.  It is like thick craft foam, my hubby had it in his garage and said I could use it.  I cut a hole in it for his neck to stick through and used the sticky backed foil to cover it all to match his "head".
Then the collar needed some edging...
The collar edge is made from the kids foam puzzle mats.  The large rivets are actually giant paper brads (split pins) which I pushed into the foam, then sprayed the whole thing copper and distressed it with black paint.

This is the stash of stuff I got at the Rope Shop.  A lot of it got used for the airships,but the large ring was what I used below as his face window.  I found some wingnuts at my Mica Hardware store and glued them in place with a split pin for decoration!  I used the alcohol inks for the distressing of the plastic insert and the copper spray paint.  I glued a strip of the same foam as the collar to the edge of the window so that it had some depth.  I added normal sized split pins or brads to this for texture and to match the collar.
I mixed some black paint in with the decor adhesive and glued the rings in place so you did not see any gaps.  Here he is as "nearly headless Nick" from Harry potter...

This guy then set the theme for the exposed brick wall in the Library room as I had found an interesting electronic board at the junk yard which had "speak to diver 1 and 2" printed on it which obviously had come off a boat....


 I then piped the artwork from the board, through some "air tanks" across to the shelves and into the diving bell.
More about the exposed wall in part 10 tomorrow!

Sunday, 7 August 2016

Steam Restaurant part 8 "Travel room - exposed brick wall"

When they purchased the restaurant, there were already two areas where the plaster was removed to expose the old brickwork underneath.

I had suggested pipework in the exposed brick area to look like this is what was found when they did the renovation.

When I was scouring the scrap yards I found this bicycle wheel and an old trolley wheel which I decided would work well as a penny farthing.
I then set about adding this to my pipework idea for the exposed brick area as this room had a travel theme.
The photo above was taken late one night in my car port.  I demarcated the size of the exposed brick area with white pipework and then set about designing what was going to happen inside it.
Little did we know how fragile the bricks and "mortar" were.  They crumbled if you just looked at them funny.  This picture is of my dear hubby helping me to install my creation.  Eventually it got to a point where it was a case of "find a reasonable looking brick and drill that one, then decide what was going onto it!"  So it turned out almost like my original, just with a few small tweaks. 
 The giant heavy fire hydrant handles (in the photo of my layout) had to be exchanged for smaller ones as the wall would never have stood up to the drilling required for the thick bolts to hold the heavy ones.  They then got moved into the upstairs design which you will see in a few days.  Nothing like designing on the job!

Saturday, 6 August 2016

Steampunk Restaurant part 7 "Making fake old gauges"

I wanted to have lots of gauges and handles in the pipework I was going to put on the walls in the restaurant.  The only problem was that the gauges I could purchase were expensive and too modern looking as well as very small.

So I set about finding various items I could turn into gauges.

Tea strainers, breakfast bowls and metal dishes became my new best friends!  I found these at the Crazy Store (I guess it is a bit like the Dollar store)
I sprayed the plastic items copper and took out the mesh from the tea strainers and added some printed gauges I had found on the net.
I then glued on some half Christmas ornaments and alcohol inked them to look like they were rusted.
These were then big and bold as well as reasonably priced.