Friday, 5 April 2019

Deliciously large cupcake tags

Hello there

Who knew I would be back on my blog so soon?  Hopefully a trend for the future!

I am having a blast with the stuff I bought from the StempelBar in Berlin.  My latest purchases were the new Distress Oxide sprays and some stamps.

Today I decided to give the sprays a try on some tags.
Here you can see the base tag is a purchased set of size 8s and they are quite yellow, so they affect the colours slightly, even though the Oxide sprays are quite opaque

I sprayed the colours onto the craft sheet and dipped the tags into the puddles of colour... Because I had to travel light when we moved to Berlin, all I have with me is my hair dryer which I thought would be fine... Lesson learned .. It blew me ink off the tag!

I then stamped the cupcakes onto white card stock and painted them with a combination of mustard seed, picked raspberry and peacock feathers distress ink and paint using my water brush.
After fussy cutting them out, I glued them on using glossy accents and stamped the Ranger sentiments with Jet black archival ink.  I also went round the edge of the tags with jet black archival ink which I learned from Marjie Kemper.

The tag with the 50 on is for a special friend and the other two are for my stash.

Monday, 1 April 2019

Colourful Tags

Mid December 2018, my hubby got transferred from South Africa to Berlin, starting 1 April!  It's amazing how fast things can be done and how quickly time goes, because today I am writing this in Berlin as my hubby sets off for his first day of work and I take on the new role of home maker and home hunter!  We have temporary accommodation for 2 months while we search for our own place.

I have brought a small collection of craft stuff with me in my hand luggage as the rest of my crafty stash sails its way over in a container!

I knew I would need some sanity in this new city.

On Friday last week I went on a mission and found an art/craft shop and a pukka gem of a craft shop..

At the first shop Edelhoff... I was very well behaved and only purchased one stencil...

It had the most incredible selection of stuff... everything from wool to craft to art equipment.
 It is massive!

Below I am outside the Stempel Bar ... My  new heaven on earth!

I was very happy to see the Ranger sign!  Apparently the notice above it says "Your husband called and you can spend endlessly"  Wouldn't that be wonderful!  For good measure... I took mine with!


I think I am going to be very happy here!

Although the things I purchased at this store will have to wait till I can use them as my Vagabond is on its way in the container!

Inspired by being in such awesome creative shops, I set about playing on a tag.  Amazing how much stuff one can fit in the little bag!

 working on the dining room table...
 I started with distress paint through my new stencil in Mustard Seed, Picked Raspberry and Peacock Feathers.
 When this was dry I inked over the top in the same colours of distress ink.
 I found my Letter it set of stamps by Ranger and added some wording.  Then I chose some pre die cut things from my stash which I had brought with me to cut up and add to my tag and filled in with a few stamped images and dot fade stencil work.
 The black edges did not show up on the black table background... amazing how different the same tag looks on a different colour!


Last night I set about creating some tags to while away some time...  This time I played with my new gradient stencils in circle, square and hexagon.... using the same distress ink colours again:  Mustard Seed, Picked Raspberry and Peacock Feathers.

Here they are:


Saturday, 30 September 2017

5 GIANT steampunk hats


Hello there

I received an order for 5 giant steampunk hats for decor in a new Steampunk Cafe in Durban.  The match box in the photos are to try and give you some sense of scale.


You might recognize the hair diffuser on the top of this one... My mom got it free with her new hairdryer, but did not need it, so sent it my way...


The springs are inside some test tubes... Hard to see in this photo...


The dome on this hat is a barometer. I made the needle in Corel Draw and then sent it to my 3D printer!  I love that thing!  I also used it to print the electrical coils on the side of this hat.

I started with a trip to China Town and purchased some party hats...
Then I went to my local plastics shop called Mambo's and purchased some waste paper baskets and an ice bucket...  It turned out that I had to go back and get another ice bucket to use for the Mad hatter hat as the one waste paper basket was not working out right...
Things changed around a bit as I made up my mind for each hat.  I kind of work on a whim... I started these hats on Sunday night and finished them on Monday night after a marathon session in my studio from 6am to 11pm!

This photo shows 4 of the hats in various states of undress...  The normal black top hat on the right hand side is for scale purposes...

This is the top of the Copper hat you can see above.


This is an ice bucket on top of the sombrero.  At least you can carve into the polystyrene so that the Christmas ornament could sit flush on the hat.

The gauges were found on the internet and I had them printed to the right size for my various Christmas ornaments...

I was working at such pace that I forgot to take a before shot of this hat below.  It is the Spanish hat with the pompoms on it with an ice bucket on its top to create the Mad Hatter shape.  I also carved the sides to be able to add the Christmas ornament for the gauge.


Sunday, 17 September 2017

The puppeteers and their Diver

I was inspired by the French Giant Marrionettes by Royal de Luxe who have a giant vintage diver as part of their set of giant puppets.
I started with an articulated drawing person.

found some 1/35 scale army men at my local hobby shop and painted them all silver.
I then 3D printed a helmet, gloves, boots and a buckle for the diver.
 The collar for the helmet is made from craft foam and toilet roll!
I got out my sewing machine and made him a little suit which I then died with Tim Holtz Walnut stain distress spray. I crunched the fabric in the appropriate places and let it dry like that, this way it dries light and dark and keeps the impression of the folds.
I sprayed the 3D printed stuff silver and then used black paint on them to distress them and to show up the details.  along the lines of Tim's painted industrial technique.
I then glued the men and diver to the base and added their rods to manipulate him.  These are florist wire.


Saturday, 9 September 2017

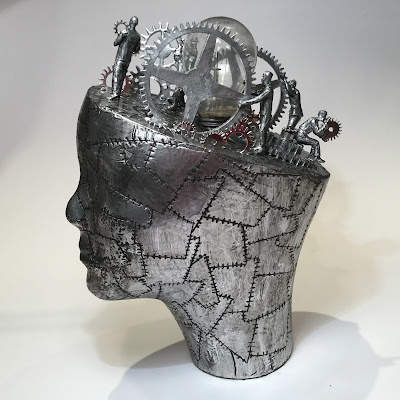
Steampunk head "Mind Blown"

Well hello

This is a creation for Truth Coffee...  I am busy with a series of things to go in the pods...

I started with a wig head and gave it a lobotomy.

Then I covered it in sticky backed foil pieces and outlined each one with a ball point pen then added the stitch marks.


I covered the top of the head with an embossed piece of sticky backed foil.

Once it was all covered, I added the black paint which I then rubbed off again to create the depth in the crevices created by the ball point pen and embossing folder.

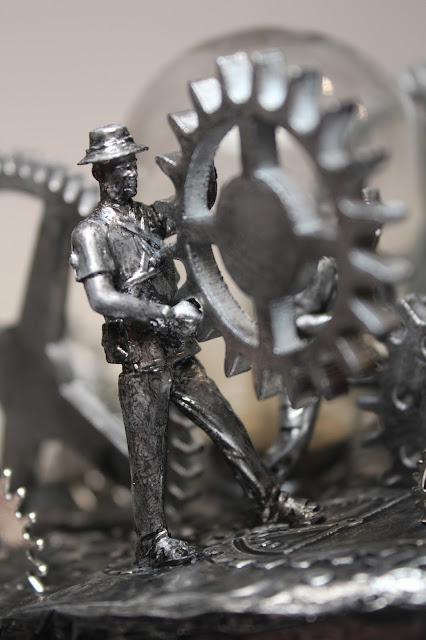
I 3D printed some cogs and bought some men in kit form from my local rail road shop.  Sprayed them all silver and distressed them with black paint too.

I found an old blown light bulb which gave rise to this projects name:  Mind Blown! and placed it in the center hole which came with the wig head.

The last thing was to carve hollows for the gears to go into and glue them and the men in place.