Showing posts with label Tim Holtz. Show all posts

Monday, 25 November 2019

Vintage, Steampunk giant Christmas Baubles

I decided that I wanted giant Christmas baubles on my tree in the garden... so off I went to purchase some pollystirene balls to decorate myself... The shop only had 5... I have a big tree... 5 wouldn't do!  Luckily I found some affordable ones ready made and purchased those for my outside tree...
Which left me with 5 balls to be decorated any way I wanted... no longer restricted by weather...

Let the fun begin!

I decided on the vintage look...

I got out my various books baught at markets, hoarded from my childhood or raided from my mother's clean outs... and set about finding 5 very different papers to tear up.
I started with my school hymn book and Tim Holtz Distress Collage Medium - Vintage.  This stuff has two advantages... one: it gives the paper an instant aged look in one step and two... you can see where you have put the stuff!  What a pleasure!
In the photo above of normal book paper, you can see the new piece has been placed on the bottom layer of Collage medium, ready to have its top layer applied.  Thats how you roll... bottom layer on ball, place paper, add top layer and repeat till you have covered the whole ball.
 Here are all the balls finished with their different papers... ready for decoration!  I used half a jar on these 5 x 12cm diameter balls. 
 I started with some die cuts which I adhered using the matt Distress Collage medium.  This works great with the fiddly writing of the Christmas Ribbon die as seen below where I placed a black die cut off set below the red one to create a shaddow.
I went on a trip to Poland and visited a shop called Paper Concept, there I found these Babule Hangers... they come in lots of sizes. 

 I could not decide between traditional Christmas style for these baubles... or Steampunk... In the end... I went with both!  So they have a vintage Christmas look with a subtle hint of steampunk... some more subtle than others!

As I worked through the day, each bauble took on a life of its own, depending on what I found as I shopped my stash.

 This technique was done using matt collage medium over the Merry christmas die and then rubbed walnut stain distress crayon over it.  What an awesome vintage look.


 At the moment, they are all haning on my vintage suitcase tree... my storage solution in my lounge... each case has various art/steampunk materials stored in it!  The best of both worlds.... suits my vintage penchant and holds all my stash!

Here are the (police file style) close ups of  each ball... front, back and top...


  The Noel die cut was run through the rivits folder and then I rubbed blacksoot distress paint into the hollows and rubbed the excess off again as per Tim's technique called Painted Industrial on page 46 in his Compendium of Curiosities book, Volume 3.

 These were real clock parts found at a vintage market in Berlin
 The Pinecones were made using the Tattered Pinecone die.

I added a drop shaddow to the letters with a permanent fineliner and the white "shine" dots with a posca pen, this then started me on the white accents for this particular bauble...as I said... they took on a life of their own as I worked.
 I drilled a hole in the top of the wishbone using Tim's tool to hang it from the chain.
 To go with the wishbone, I aged a ticket with Ground Espresso Distress ink after crunching it up in my hand so that the distress ink caught the creases.

 I decided that "less is More" for the bauble below, I rather liked its simplicity.


The copper paper is rather hard to photograph, it is quite shiny in real life...

 The bauble hanger was coloured with copper alcohol ink to match the metal embelishments.

The various dies I used were:  Vintage Noel, Christmas Ribbon, Holly Branch, Festive Greenery and Holiday greens all adhered with hot glue.  The metal embelishments were adhered with Glossy accents.

Saturday, 9 September 2017

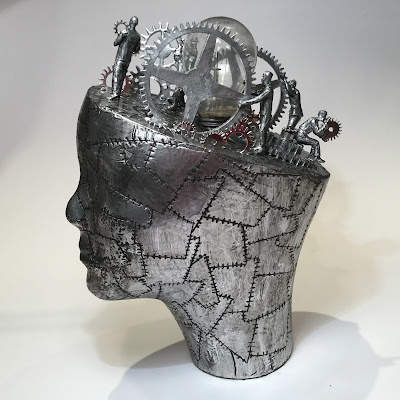
Steampunk head "Mind Blown"

Well hello

This is a creation for Truth Coffee...  I am busy with a series of things to go in the pods...

I started with a wig head and gave it a lobotomy.

Then I covered it in sticky backed foil pieces and outlined each one with a ball point pen then added the stitch marks.


I covered the top of the head with an embossed piece of sticky backed foil.

Once it was all covered, I added the black paint which I then rubbed off again to create the depth in the crevices created by the ball point pen and embossing folder.

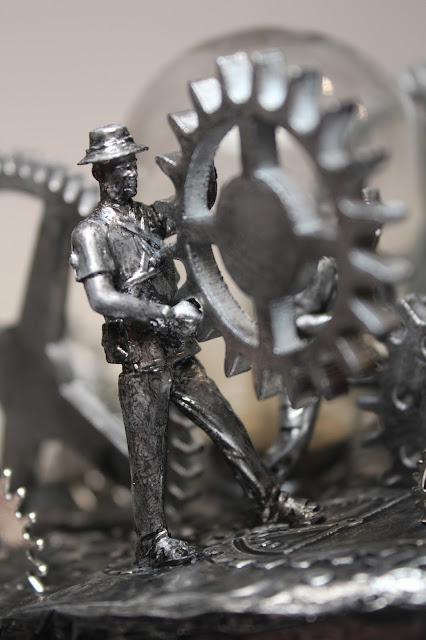
I 3D printed some cogs and bought some men in kit form from my local rail road shop.  Sprayed them all silver and distressed them with black paint too.

I found an old blown light bulb which gave rise to this projects name:  Mind Blown! and placed it in the center hole which came with the wig head.

The last thing was to carve hollows for the gears to go into and glue them and the men in place.


Wednesday, 20 January 2016

Steampunk Time Travel Art Installation at Truth Coffee

May I suggest you get comfortable and have a mug of coffee on hand before you delve into this photo heavy post...  you could be here a while...

Above is the final art installation piece (3.6m x 1.8m) with airship and below is the beginning of its story which started in June of 2014 when I created this canvas below about Tim Holtz and Truth Coffee...
I posted this little canvas on Twitter and the owners of Truth Coffee went mad for it... I took it in to them and they asked if I did commissions... the answer was YES and so over the next 19 months I have been purchasing stuff and creating even more things for this enormous task.

Here you can see the giant 1.3m clock and the various items I have Steampunked using loads of Tim Holtz's products. 
This was the beginning of the banner saying "beware of Airship Pirates in this vicinity"
After a while I had quite an eclectic pile of things growing on my dining room table...  The pvc gutter piping was sprayed copper and had rivets glued on.
I cut giant cogs out of foam core bord and sprayed everything silver.
Three weeks ago I had 3 large Masonite boards cut to 1.2m x 1.8m and base coated them with a beige PVA and set out all the items I had made so far.  I then decided the cogs needed to be copper...
Having decided where it was all going and having marked it out, I set about gluing the half orbs down.
When the glue was dry, I started painting the boards with artists acrylics.
At this stage, they were all on my tables in my studio, but this was hard to see the overall effect when I added all the cogs and other 3D items, so I dropped it down onto the floor.
 Here you can see me giving the whole thing a glaze of burnt umber to warm it up a bit.
This is the layout I finally decided on, but everything was still too shiny and new, so I set about aging it all.
 from this... to this...
To be able to visualize everything properly, I had to take the boards to my house... this involved getting a friend with a VW caravel to transport it for me for which I was most grateful.
This is the artwork together with the airship (how I made that is here) in my garage.
 I then deliberated between the hands on the clock or swapping them with the swards on the scroll... see above and below...
Eventually this option won!
 Seeing as Tim Holtz is known for technique tags and he was part the reason I got this commission in the first place... I used a shipping tag for my name!
The airship about to take her maiden voyage of 22km to Truth's HQ at 36 Buitenkant Street.
Where she took up temporary residence under the coffee beans...
 The van did not have space for the giant clock as well as the artwork and airship, so I had tied it to the roof of my car!
 Then the 4 hour job of installing it all began... I give you... The blank wall...
To install this project I had help from Nathan and Patrick from Truth and here you can see my hubby helping Nathan who is drilling the holes in the boards while still on the floor.
 I was an assistant too, passing up the necessary bolts etc... 
 Here are the boards before we stared adding the 3D stuff.
 Then we added all the items piece by piece
 Until it was just the decor items that had to go on suitcases which are floating shelves.
 and finally put up the airship
My ecstatic face in front of my artwork 
 I have truly left my mark!
In this shot you can see the dress form on the far right which was placed here in July 2014 in anticipation of her backdrop arriving!

Above is the before shot and below is the after shot!
I would like to thank David, Richard and Andrew from Truth Coffee for giving me this opportunity to create something for their building and allowing me to realise a dream.

If you have made it this far and would like to read the manifesto I wrote about this piece, read on:

 Steampunk
noun
A genre of science fiction that typically features steam-powered machinery rather than advanced technology.


This installation art piece by Belinda Basson is a play on time and travel.  The non-functional clock’s hands have been intentionally removed by the airship pirates and their swords put in their place thus creating an interesting juxtaposition and reminding the viewer of the thief of time.

Images supporting both the idea of time and travel re-occur with the use of a miniature alarm clock which looks like it has been brought up from the depths of the ocean after many years of languishing there, its hands stuck at 3 o’clock.  Then there is the genuine hour glass where the sands of time will slide by over a measured hour.  This stands on a vintage suitcase which has been worked over in embossed metal foil with images that depict engaged cogs as from the internal workings of a clock and compass to emphasise the relation to the mannequin standing meters away who wears a foil corset and has matching “skin”.  Her framed male counterpart above her harks back in time to the Victorian era when paper cut out portrait silhouettes were the height of fashion.

The leather suitcase stands open to display the items the time travelling voyager might have used to plan their travels, such as the globe to plot the route, typewriter to communicate anecdotes of the things witnessed back to their loved ones and the camera to capture all the memories for posterity.

Part of the installation, but hanging some distance away, is the rivet studded airship with a gondola depicting a somewhat altered version of the Truth Coffee building, in which it is suspended.  The airship’s stabilisers take their design from the Truth Coffee shop’s logo while the nose-cone and propeller seem to have been retrieved from the same mysterious ocean depths as the miniature alarm clock.

All of this is set against a sea of cogs and pipes aged and rusted due to lack of use, reminiscent of a time when steam was the height of power.