
Lady Vagabond by Shamela aka Craftigal
REQUIREMENTS:
2X A4 250GSM WHITE CARD
2 STRIPS OF WHITE OFF CUTS APPROX 5.25’ X 0.75’
SBBS25: SIR VAGABOND 8X8 ( 1 SHEET)
DFLDC27 LADY VAGABOND DIE CUTS
SBBS27
LADY VAGABOND 8X8 BACK COVER SHEET EMBELLISHMENTS (LADY &
CAT)
ABBREVIATIONS: DP - DESIGNER PAPER.
INSTRUCTIONS:
STEP 1: CUT 2 PIECES OF WHITE CARD TO 5.5’ X 5.5’. THIS IS YOUR BACK BASE AND THE FRONT OF YOUR CARD.
 |
STEP 2: CUT 2 PIECES OF CARD TO 5.5’ X 3.5’ (B)

STEP 3: SCORE YOUR (B) PIECES AT 0.5’ ; 1’ ; 1.5’ ; 2’ ; 2.5’ AND 3’.
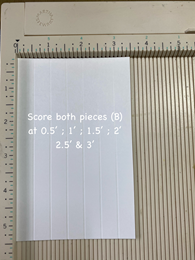
STEP 4: CREATE A CONCERTINA/FAN BY FOLDING THE SCORE LINES INTO VALLEYS AND HILLS. IT SHOULD LOOK LIKE THE IMAGE BELOW.
 |
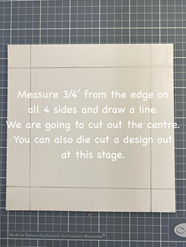
STEP 5: CREATE THE FRONT FRAME OF YOUR CARD BUT MEASURING 0.75’ ON ALL 4 SIDES AND DRAW LINES AS SHOWN. YOU WILL NOW REMOVE THE CENTRE PANEL TO CREATE A FRAME.

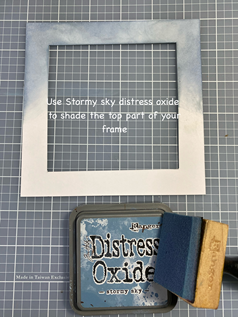
STEP 7: STAMP SIR VAGABOND WTKAT15 ON THE TOP OF YOUR FRAME WITH THE SAME INK.

STEP 8: ATTACH THE ONE CONCERTINA (B) TO THE SIDE OF YOUR BACK BASE (A). MAKE
SURE THE JOINER IS FACING TOWARDS THE INSIDE OF YOUR CARD. DO THE SAME ON THE OTHER SIDE. WE WILL BE
COVERING ITHE BACK WITH DESIGNER PAPER TO COVER.
 |


STEP 9: FUSSY CUT YOUR DP AS SHOWN BELOW.

STEP 10: FUSSY CUT THE REST OF YOUR DP AS SHOWN BELOW

STEP 11: REMOVE APPROX 1 7/8’ FROM THE LEFT SIDE OF THE TOP PIECE OF YOUR DP.

STEP 12: TRIM APPROX 0.5’ OFF THE RIGHT SIDE OF THE SAME PIECE.

STEP 13: TRIM APPROX 2’ OFF THE TOP OF THIS SHEET.
 |
STEP 14: GLUE INTO YOUR BASE AS SHOWN BELOW
 |
STEP 15: USE STORMY SKY DISTRESS OXIDE AND SHADE IN THE EXPOSED AREA ON YOUR BASE CARD

STEP 16: ALIGN NEXT PIECE OF DP AND TRIM DOWN TO SIZE. MAKE SURE THE PATTERN MATCHES UP
 |
STEP 17: DO THE SAME WITH THE LAST PIECE OF DP.
 |

STEP 19:
ATTACH THE WHITE STRIP APPROX 1.75’ FROM THE BOTTOM OF YOUR BASE. ON THE
FIRST STEP OF YOUR HINGE (B). MAKE SURE IT IS EVENLY ATTACHED AND DOES NOT
TOUCH THE INSIDE EDGE OF YOUR HINGE.

STEP 20: ATTACH 2ND STRIP APPROX 0.5’ FROM THE BOTTOM OF YOUR BASE. GLUE TO THE NEXT STEP ON YOUR HINGE. MAKE SURE YOU LINE UP THE PATTERN SO THAT IT MATCHES PERFECTLY.
 |
STEP 21: GLUE YOUR FRAME TO THE TOP OF YOUR
HINGE. PLEASE REMEMBER TO ONLY ADD GLUE TO THE SIDES. THE TOP OF YOUR FRAME HAS
TO REMAIN CLEAR OF ADHESIVE TO MAKE SURE YOUR CARD WILL BE ABLE TO FOLD FLAT
FOR POSTING.

STEP 25: FINALLY EMBELLISH WITH FINAL PIECE OF YOUR DP AS SHOWN AND ADD YOUR DIE CUTS (DFLDC27) AND IMAGES CUT FROM THE LADY VAGABOND 8X8 DP (SBBS27)


