Hello Dear patient reader
I have neglected this corner of cyber space, but thought I would drop by with some close up details of the classes I am teaching from 1 August - 1 September across Australia with The Scrapbooker's Confetti Box.
In no particular order...
First up is the half day class: Steampunk egg... here are its "mug shots" from different angles...
Western Australia - Melville Bowling Club - Alfred Cove Thursday 1 August 9am - 1pm
South Australia - Kauri Community & Sports Center - Seacliff Thursday 8 August 9am - 1pm
Victoria - Strathmore Bowling Club - Strathmore Thursday 15 August 9am - 1pm
New South Wales - Thursday - Salvation Army Hall Belmont Nth Thursday 22 August 9am - 1pm BOOK HERE
Queensland - Geebung RSL - Geebung Thursday 29 August 9am - 1pm
This 17cm tall display piece is full of wonderful techniques including how to get a stamped image on a curved surface! Belinda is supplying the vintage German dictionary paper to use as a base that she sourced in the Berlin vintage market. This piece will be a talking point on display in your home.


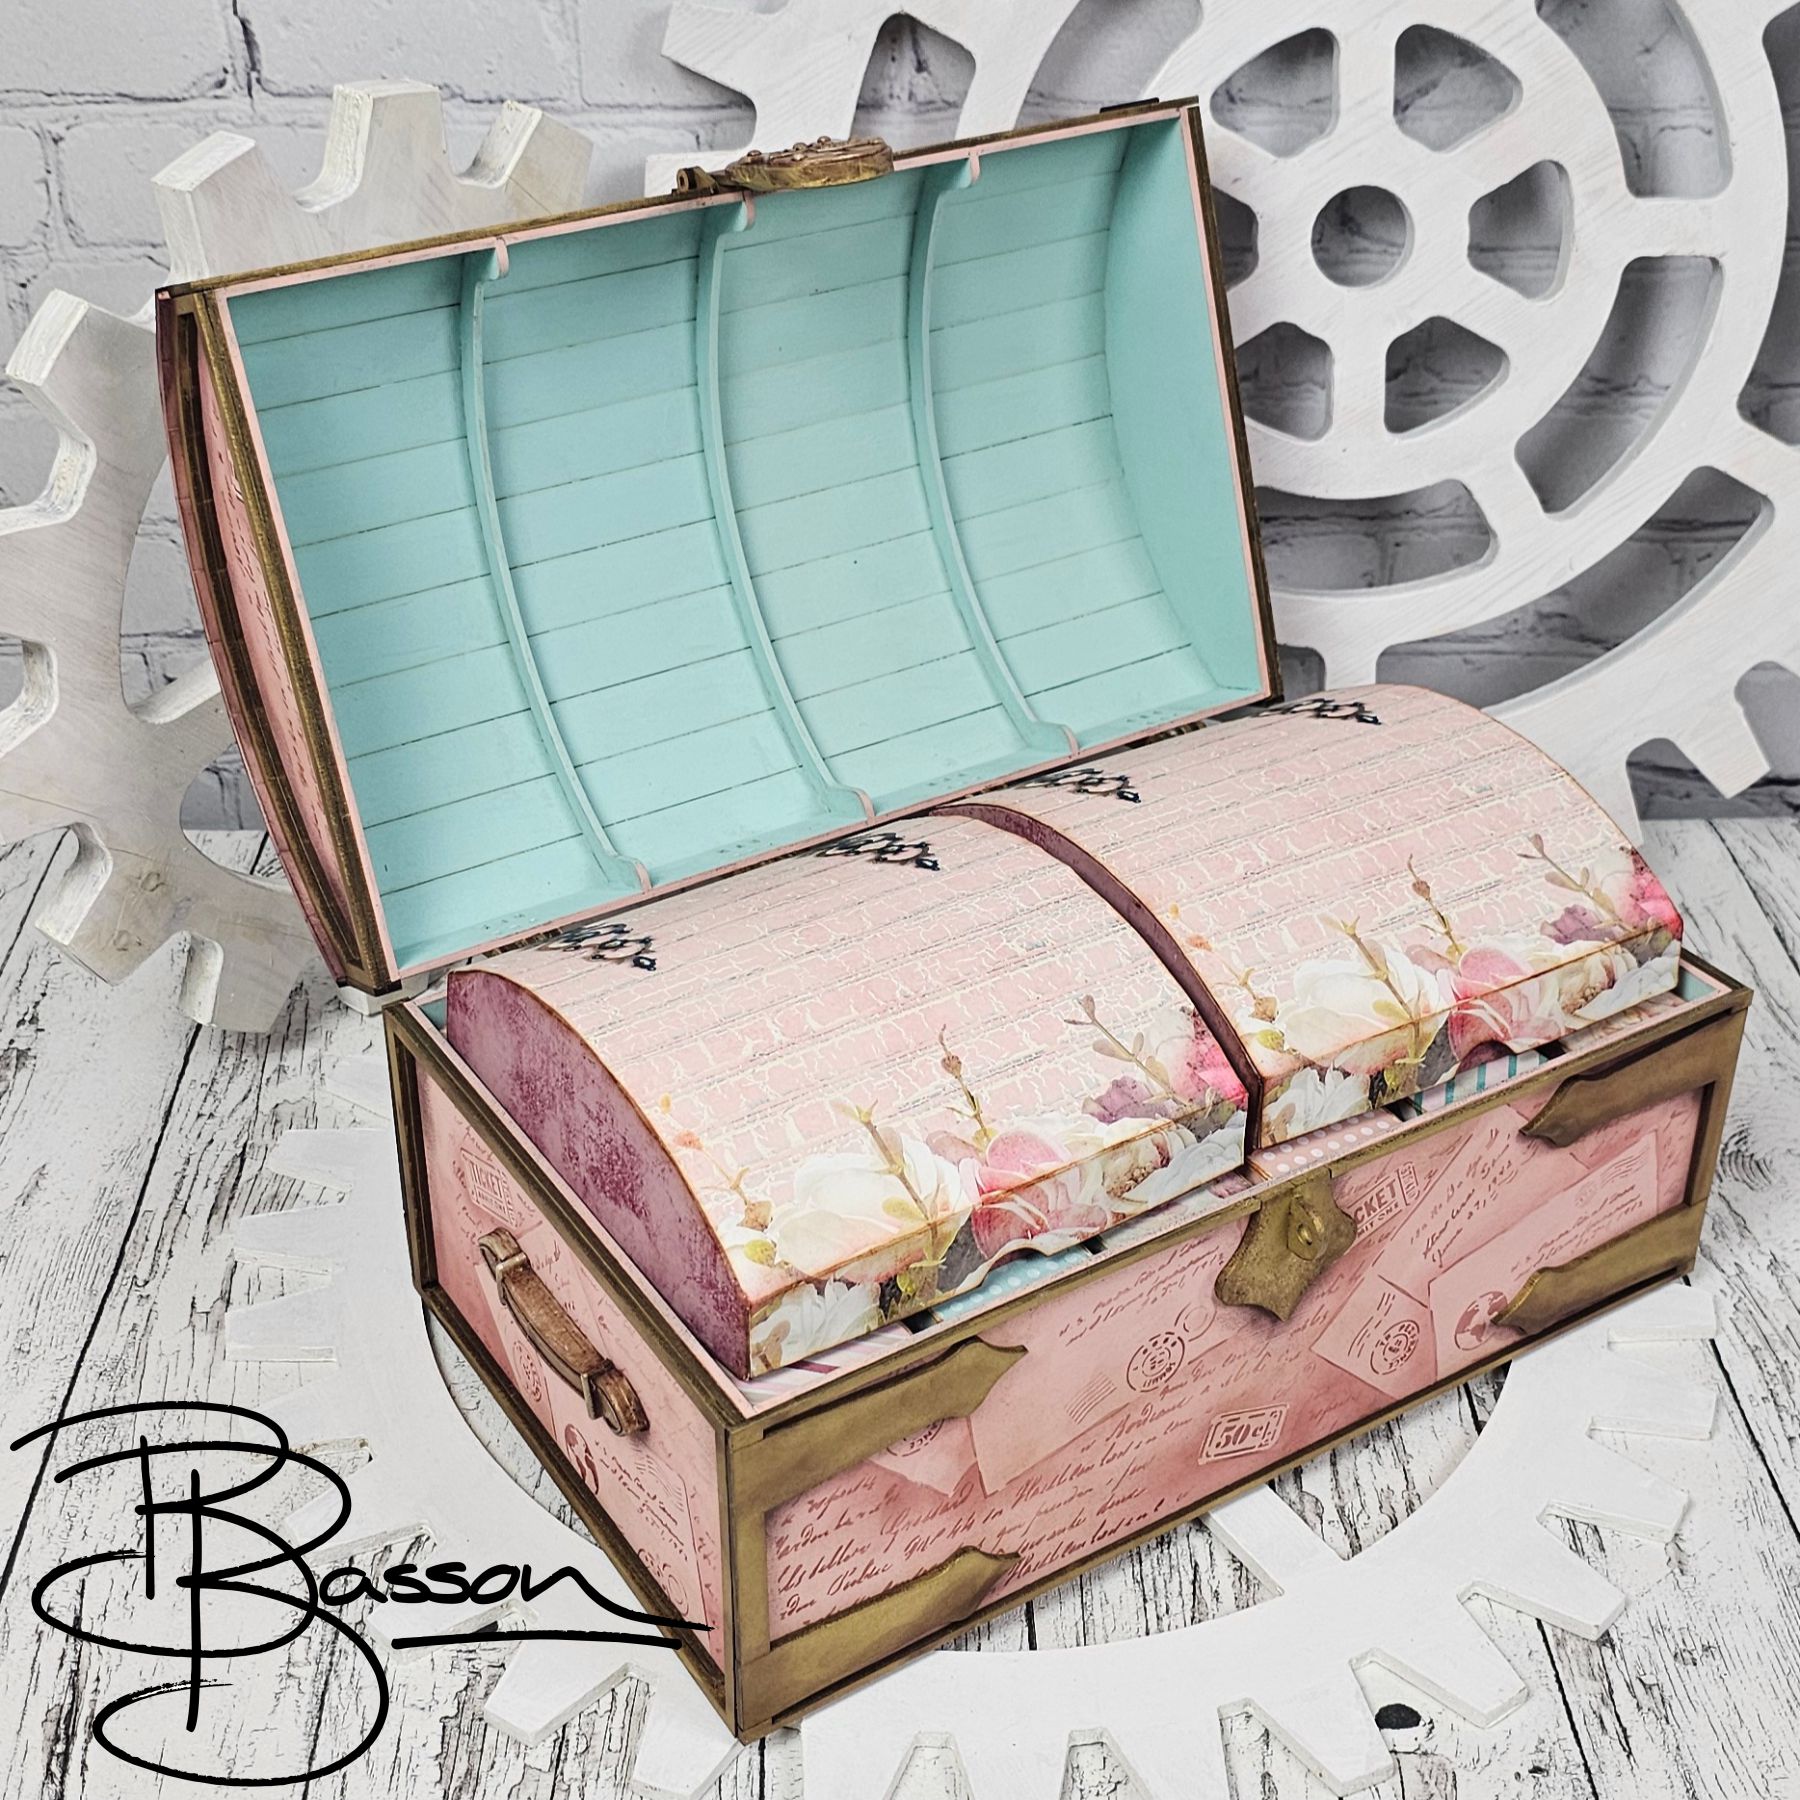
Steamer Trunk with 8 Storage Boxes
Western Australia - Melville Bowling Club - Alfred Cove Saturday 3 August 9am - 6pm
South Australia - Kauri Community & Sports Center - Seacliff Saturday 10 August 9am - 6pm
Victoria - Strathmore Bowling Club - Strathmore Saturday 15 August 9am - 6pm
New South Wales - Fri, Sat & Sun Swansea Community Centre Saturday 22 August 9am - 6pm
Queensland - Geebung RSL - Geebung Saturday 22 August 9am - 6pm
Being a steampunk at heart, Belinda could not resist designing a beautiful Steamer Trunk based on vintage ones that used to have shaped boxes in the lid. There are 8 boxes inside the trunk that can be used to organise anything you like including large moulded items. The boxes are numbered using beautiful number plates that Belinda photographed in a flour mill museum in Tomar, Portugal. She has also designed all the papers with the beautiful hinges already printed on the paper to make putting the boxes together easy and pretty at the same time. There are also printed instructions to follow.

Here you can see that the boxes are quite accomodating and you can store some large resin pieces in here or whatever takes your fancy!


I based these curved boxes on the ones that were originally in the steamer trunks for toiletries.


Lady Vagabond Mini Album Half Day Class
Western Australia - Melville Bowling Club - Alfred Cove Thursday 1 August 2pm - 6pm
South Australia - Kauri Community & Sports Center - Seacliff Thursday 8 August 2pm - 6pm
Victoria - Strathmore Bowling Club - Strathmore Thursday 15 August 2pm - 6pm
New South Wales - Thursday - Salvation Army Hall Belmont Nth Thursday 22 August 2pm - 6pm BOOK HERE
Queensland - Geebung RSL - Geebung Thursday 22 August 2pm - 6pm
You will make this album from scratch and use the papers that Belinda has designed especially for this project using the photo windows from her Granny’s original album. There is lots of space in this album for photos, tickets and other items and you can arrange things to suit yourself. 4 full sheets of extra paper are supplied for you to matt your photos.


Folio for storing tiny little things
Western Australia - Melville Bowling Club - Alfred Cove Friday 2 August 2pm - 6pm
South Australia - Kauri Community & Sports Center - Seacliff Friday 9 August 2pm - 6pm
Victoria - Strathmore Bowling Club - Strathmore Friday 16 August 2pm - 6pm
New South Wales - Fri, Sat & Sun Swansea Community Centre Friday 23 August 2pm - 6pm
Queensland - Geebung RSL - Geebung Friday 30 August 2pm - 6pm
You will make this folio from scratch using the papers that Belinda designed specifically to make your life easier to put it all together. She has pre cropped all the shapes so you just have to cut, fold and stick it all together… no cutting and measuring involved in the decorating! You will however need to score and stick the base together which is easy to do by following her clear printed instructions supplied.


Creative Station Suitcase stack for storage
Western Australia - Melville Bowling Club - Alfred Cove Friday 2 August 9am - 1pm
South Australia - Kauri Community & Sports Center - Seacliff Friday 9 August 9am - 1pm
Victoria - Strathmore Bowling Club - Strathmore Friday 16 August 9am - 1pm
New South Wales - Fri, Sat & Sun Swansea Community Centre Friday 23 August 9am - 1pm
Queensland - Geebung RSL - Geebung Friday 30 August 9am - 1pm
Storage is an issue in most crafters space and this one will be both practical and pretty! The base is made from MDF and is a great item to store all your things for your favourite hobby. This could be metal embellishments, washi tape or paper ephemera and die cuts. It is totally up to you.
Belinda has designed the papers herself and you will learn how to mix paints to match the colour scheme.

This is an example of the kind of things I had in mind to store in my Creative Station when I was designing it.


Full Day Typewriter class with File storage inside.
Western Australia - Melville Bowling Club - Alfred Cove Sunday 4 August 9am - 6pm
South Australia - Kauri Community & Sports Center - Seacliff Sunday 11 August 9am - 6pm
Victoria - Strathmore Bowling Club - Strathmore Sunday 18 August 9am - 6pm
New South Wales - Sunday Lake Room, Swansea Community Centre Sunday 25 August 9am - 6pm BOOK HERE
Queensland - Geebung RSL - Geebung Sunday 1 September 9am - 6pm
Typewriters are one of Belinda’s favourite things and so she decided to make a pretty, but practical piece to display in your craft room or home. The file storage inside the typewriter can be taken on crops or just stood on your desk to work from. It can house anything from vintage book pages, ephemera, photographs to die cuts. The papers are designed by Belinda specifically for this project and includes images taken from the vintage typewriting lesson book that her mother used in college, back in the 60s!

These are the file folders that slip out of the box inside the typewriter.


