Thursday 25 February 2021

Book ends and Junk journal by Hadry

Dear Reader
Hadry created these book ends together with this junk journal using Lady Vagabond papers and moulds.
The cover of the junk journal is from the book paper and she has made her own inside.


the book ends holding up the junk journal


I love the awesome paint job on the lock mould using Allegro paints.


Tuesday 23 February 2021

Nikki from Disorganized Crafter created a Draughts board

Dear Reader

This is Nikki's creation using the moulds from Lady Vagabond to make the board suspended in the air!  She cut and turned the "crows nest" on its head for two of the airships, so that you can see which side of the board is which.

I love how she used the propellers as the game pieces.  Now I want to reach into the screen and move a piece!


Thursday 18 February 2021

Tamar Perry's Key holder


 Dear Reader

This is Tamar's Design Team artwork that doubles up as a key ring holder!  Here is her explanation!

This Mixed Media project is inspired by my current state of mind of looking for a new home.


It is a very difficult process, and I am feeling a bit jealous that Lady Vagabond has a flying house which she could take anywhere with her.


My new home will hopefully be one for a long long time, and nothing signifies a home better than a key.


 Once you have entered your home and hung up your key you can relax and be at ease.

I used the small white flowers A3 rice paper, the keys and keyhole molds, sand paste, modeling paste to create a tree bark like texture, vintage paste, pasta sculptura and soft clay to make the leaves, allegro paints, extra forte glue, cerantica gold, paper sheet for the flowers and the beads. And of course – allegro paints, and a stencil.

I used a piece of wood as the substrate for This Mixed Media art.  Note the little dangle! I love dangles !!


Tuesday 16 February 2021

Anne Redfern's February DT post with a Music Box


Dear Reader

To learn more details from Anne herself... hop on over to her blog here!

I think she is so clever to create dimension on the back of the Lady Vagabond mould so that she can be viewd in the round!  Genius... quite Genius!


I love how she painted Lady Vagabond too.
Now I am going to be on the lookout for a music box with a dome too.  This is a great thing to make over!


Sneaky little Supervisor cat sitting at the back.  He is like "Where's Wally"  he turns up everywhere!


Monday 15 February 2021

Shamela's Mini alum to fit inside her Travel Trunk

Dear Reader

I have no idea why this did not post on Thursday last week when it was Shamela's turn to shine on the Lady Vagabond Design team...

Here is her amazing mini album that she created to fit inside the Travel Trunk that was previously featured here.
The cover is fll of interesting textures and layers where she used the Grey board laser cut word on the spine and Escape The Ordinary stencil on the back cover as well as cutting and layering the House paper to create dimension by raising the houses up on foam tape.

Here you can see how it fits the space perfectly.
Below you can see a glimpse into the pages inside.


To see a walk through of her album you can go to her YouTube Channel here!

Tuesday 9 February 2021

Diysil Art is the Design team member posting for today


Dear reader

Today it is Silvia's turn to inspire you with this gorgeous travel journal cover that houses two books inside.

I love the layers that were created with these cut outs from the back of the paper pad.  To keep the Lady Vagabond separated from the background, she carefully cut her out with a white boarder.


The two books are held together with cute little clips


Thursday 4 February 2021

Tunnel Card instructions by Shamela


TUNNEL CARD

Lady Vagabond by Shamela aka Craftigal

REQUIREMENTS:

2X A4 250GSM WHITE CARD

2 STRIPS OF WHITE OFF CUTS APPROX 5.25’ X 0.75’

SBBS25: SIR VAGABOND 8X8  ( 1 SHEET)

DFLDC27 LADY VAGABOND DIE CUTS

SBBS27  LADY VAGABOND  8X8  BACK COVER SHEET EMBELLISHMENTS (LADY & CAT)

ABBREVIATIONS: DP - DESIGNER PAPER.


INSTRUCTIONS:

STEP 1: CUT  2 PIECES OF WHITE CARD TO 5.5’ X 5.5’. THIS IS YOUR BACK BASE AND THE FRONT OF YOUR CARD.


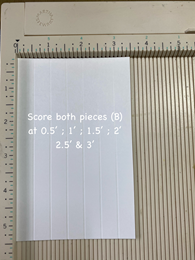
STEP 2: CUT 2 PIECES OF CARD TO 5.5’ X 3.5’ (B)

STEP 3:  SCORE YOUR (B) PIECES AT 0.5’ ; 1’ ; 1.5’ ; 2’ ; 2.5’ AND  3’.


STEP 4: CREATE A CONCERTINA/FAN BY FOLDING THE SCORE LINES INTO VALLEYS AND HILLS. IT SHOULD LOOK LIKE THE IMAGE BELOW.
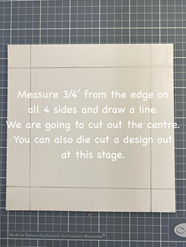


STEP 5:   CREATE THE FRONT FRAME OF YOUR CARD BUT MEASURING 0.75’ ON ALL  4 SIDES AND DRAW LINES AS SHOWN. YOU WILL NOW REMOVE THE CENTRE PANEL TO CREATE A FRAME.


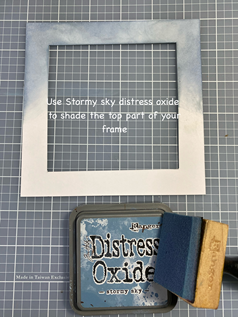
STEP 6: USE DISTRESS OXIDE IN STORMY SKY AND SHADE THE TOP OF YOUR FRAME.

STEP 7: STAMP SIR VAGABOND WTKAT15 ON THE TOP OF YOUR FRAME WITH THE SAME INK.

STEP 8: ATTACH THE ONE CONCERTINA  (B) TO THE SIDE OF YOUR BACK BASE (A). MAKE SURE THE JOINER IS FACING TOWARDS THE INSIDE OF YOUR CARD.  DO THE SAME ON THE OTHER SIDE. WE WILL BE COVERING ITHE BACK WITH DESIGNER PAPER TO COVER.


STEP 9:  FUSSY CUT YOUR DP AS SHOWN BELOW.


STEP 10:   FUSSY CUT THE REST OF YOUR DP AS SHOWN BELOW


STEP 11:   REMOVE APPROX 1 7/8’ FROM THE LEFT SIDE OF THE TOP PIECE OF YOUR DP.


STEP 12:  TRIM APPROX 0.5’ OFF THE RIGHT SIDE OF THE SAME PIECE.

STEP 13: TRIM APPROX 2’ OFF THE TOP OF THIS SHEET.


 STEP 14: GLUE INTO YOUR BASE AS SHOWN BELOW


STEP 15: USE STORMY SKY DISTRESS OXIDE AND SHADE IN THE EXPOSED AREA ON    YOUR BASE CARD


STEP 16:  ALIGN NEXT PIECE OF DP AND TRIM DOWN TO SIZE. MAKE SURE THE PATTERN MATCHES UP

STEP 17: DO THE SAME WITH THE LAST PIECE OF DP.


  STEP 18: I USED 2 STRIPS TO ATTACH MY LAST 2 PIECES

STEP 19:  ATTACH THE WHITE STRIP APPROX 1.75’ FROM THE BOTTOM OF YOUR BASE. ON THE FIRST STEP OF YOUR HINGE (B). MAKE SURE IT IS EVENLY ATTACHED AND DOES NOT TOUCH THE INSIDE  EDGE OF YOUR HINGE.


STEP 20: ATTACH 2ND STRIP APPROX 0.5’ FROM THE BOTTOM OF YOUR BASE. GLUE TO THE NEXT STEP ON YOUR HINGE. MAKE SURE YOU LINE UP THE PATTERN SO THAT IT MATCHES PERFECTLY.


STEP 21: GLUE YOUR FRAME TO THE TOP OF YOUR HINGE. PLEASE REMEMBER TO ONLY ADD GLUE TO THE SIDES. THE TOP OF YOUR FRAME HAS TO REMAIN CLEAR OF ADHESIVE TO MAKE SURE YOUR CARD WILL BE ABLE TO FOLD FLAT FOR POSTING.

STEP 25:  FINALLY EMBELLISH WITH FINAL PIECE OF YOUR DP AS SHOWN AND ADD YOUR DIE CUTS  (DFLDC27) AND IMAGES CUT FROM THE LADY VAGABOND 8X8 DP (SBBS27)