Saturday 30 September 2017

5 GIANT steampunk hats


Hello there

I received an order for 5 giant steampunk hats for decor in a new Steampunk Cafe in Durban.  The match box in the photos are to try and give you some sense of scale.


You might recognize the hair diffuser on the top of this one... My mom got it free with her new hairdryer, but did not need it, so sent it my way...


The springs are inside some test tubes... Hard to see in this photo...


The dome on this hat is a barometer. I made the needle in Corel Draw and then sent it to my 3D printer!  I love that thing!  I also used it to print the electrical coils on the side of this hat.

I started with a trip to China Town and purchased some party hats...
Then I went to my local plastics shop called Mambo's and purchased some waste paper baskets and an ice bucket...  It turned out that I had to go back and get another ice bucket to use for the Mad hatter hat as the one waste paper basket was not working out right...
Things changed around a bit as I made up my mind for each hat.  I kind of work on a whim... I started these hats on Sunday night and finished them on Monday night after a marathon session in my studio from 6am to 11pm!

This photo shows 4 of the hats in various states of undress...  The normal black top hat on the right hand side is for scale purposes...

This is the top of the Copper hat you can see above.


This is an ice bucket on top of the sombrero.  At least you can carve into the polystyrene so that the Christmas ornament could sit flush on the hat.

The gauges were found on the internet and I had them printed to the right size for my various Christmas ornaments...

I was working at such pace that I forgot to take a before shot of this hat below.  It is the Spanish hat with the pompoms on it with an ice bucket on its top to create the Mad Hatter shape.  I also carved the sides to be able to add the Christmas ornament for the gauge.


Sunday 17 September 2017

The puppeteers and their Diver

I was inspired by the French Giant Marrionettes by Royal de Luxe who have a giant vintage diver as part of their set of giant puppets.
I started with an articulated drawing person.

found some 1/35 scale army men at my local hobby shop and painted them all silver.
I then 3D printed a helmet, gloves, boots and a buckle for the diver.
 The collar for the helmet is made from craft foam and toilet roll!
I got out my sewing machine and made him a little suit which I then died with Tim Holtz Walnut stain distress spray. I crunched the fabric in the appropriate places and let it dry like that, this way it dries light and dark and keeps the impression of the folds.
I sprayed the 3D printed stuff silver and then used black paint on them to distress them and to show up the details.  along the lines of Tim's painted industrial technique.
I then glued the men and diver to the base and added their rods to manipulate him.  These are florist wire.


Saturday 9 September 2017

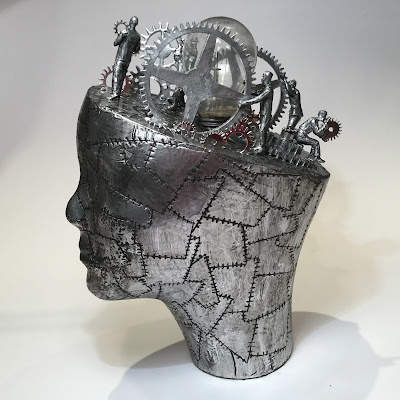
Steampunk head "Mind Blown"

Well hello

This is a creation for Truth Coffee...  I am busy with a series of things to go in the pods...

I started with a wig head and gave it a lobotomy.

Then I covered it in sticky backed foil pieces and outlined each one with a ball point pen then added the stitch marks.


I covered the top of the head with an embossed piece of sticky backed foil.

Once it was all covered, I added the black paint which I then rubbed off again to create the depth in the crevices created by the ball point pen and embossing folder.

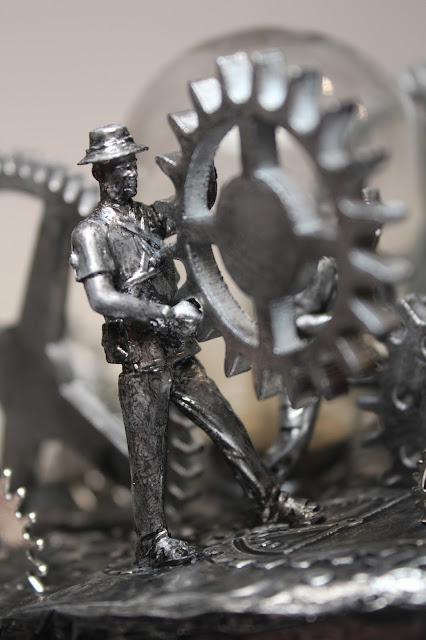
I 3D printed some cogs and bought some men in kit form from my local rail road shop.  Sprayed them all silver and distressed them with black paint too.

I found an old blown light bulb which gave rise to this projects name:  Mind Blown! and placed it in the center hole which came with the wig head.

The last thing was to carve hollows for the gears to go into and glue them and the men in place.


Sunday 3 September 2017

Sewing box make over


Quite a while ago, (make that a year or two) my mom gave me Gran's old sewing box.

I am not much of a seamstress... so I knew I was never going to use it as a sewing box...  I always wanted to make it over as an art tool box!  The question was HOW?

Why it took me so long to think of this solution I don't know...  I mean, I use this all the time for the projects I produce for art installations!  This technique is one I learned from Tim Holtz.  He called it Painted Industrial and it is on page 46 of his Compendium of Curiosities 3 book!

I am attending a two day scrapping event at the end of the month and thought this would be a brilliant tool tote...

So here it is in all its ugly fake wood and yellowed plastic glory!


Then I spray painted the handle and rims black.

After that I added embossed sticky backed foil.  (yes, I have an industrial roll of the stuff from a friend who's hubby is in the building trade)  These top two folders are by Cuttlebug and are 6"x12"

I decided to use two different designs so that I know which side is which and can open the appropriate one first... cos if they were the same... Murphy would have it that I would open the wrong one first every time!


Once that was all in place, I added the black paint and wiped off the excess.  Quite a quick afternoon's project!


Now to pack it full of inks and the like!

Truth Coffee mini book

I have decided to join in with a new blog challenge site for Mini books...  you can find the Mini Album Makers Challenge here!

This is my entry:

Back in 2014 I started the negotiations to create an artwork 2m x 4m with a 3.5m airship for Truth Coffee... This fat mini book chronicles the work....

I made it from scratch so it would fit.

I like to print all my photos first and make my pages to house the photos.  This works for me...

The idea is that I like each double spread to tell a story about one thing...

Then in the end, I make the cover to fit all the pages I have created!
 This is a close up of the cover below.  I created the Truth logo in a 3D program and 3D printed it for the space I left.  The stamped image of the 3 stooges lost their hats when I got a little over zealous with the Ground Espresso distress spray... so I re-stamped the hats on card stock, fussy cut them and added them on top for the final cover...

The close catch is a strip of leather which I embossed with an embossing folder, glued to the back cover and used an eyelet over a little knob to keep the book closed.


I did not take photos of this album as I worked... so here is one of the inside pages.  I did however shoot a video which is below so you can see all the fold out pages, it is slightly fuzzy, but you get the idea!