Tuesday, 22 December 2015

Tim Holtz December tag 2015

 I recently taught a technique tag class and had designed 4 of the 5 tags... I had hit a blank on the 5th one and no matter what I tried or put together, it did not seem right.  Then it was Tim to the rescue with his December tag inspiration on Tuesday the 1st, not a day too soon as my class was on the Friday, so I had 2 days to design my tag and kit up!
I did not have his punches, so decided to go back to his tags from 4 years ago when he last did a wreath... then I added the typewriter from another tag done that year and was finished!
Phew!
12 tags of 2015 - December | www.timholtz.com
This is Tim's tag and you can find his instructions here!

Tuesday, 15 December 2015

How To Make Distress Ink Towers

A few people have seen my 3 Distress Ink Towers on my desk and asked how I made them... Here goes:

I used foam core/board sheets to create them in two thicknesses.  Here in South Africa, we work in metric measurements and the one board is 5mm thick and the other 3mm.

When using Tim's ruller to try convert them to inches the 3mm = one tiny little square (1/8?) and the 5mm =1.5 tiny little squares... Does this help?  Don't know how to say such small measurements in inches as they are not common to me.  The bigger numbers I can do!

Moving right along...

The sides measure 3"x 18.4/8" (cut two from 5mm)
The back is 3.4/8" x 18.4/8" (cut one from 5mm)

The shelves are 3.3/8" x 2.4/8" each (cut 15 from 3mm)
(my measured dots are in the wrong place in this close up, but my score lines are correct...)

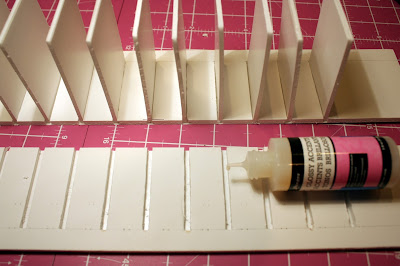
Take one of the sides and measure half an inch in from the side and draw a light pencil line from top to bottom.  This will be the front of the tower.  Starting at the bottom of this pencil line measure 9/8 and make a dot then at 1" and make a dot.  Do the same along the back edge of the side.  Repeat the other side piece.
Now turn them over and stick them together with painters tape or low tac washi tape.  Turn them over and score together.
Using a craft knife and metal ruler score down to the paper base, but not through it.
Then take a screw driver and scrape out the foam from the pencil line,  between the score lines to the back of the side. 
 Now you should have two matching sides.  I chose to not go right to the top and leave the last shelf out and make a deep area to store my re-inkers, as seen below
 I then run some Glossy accents into the hollows and place my shelves into them and weight them down with my distress inks.  When this is dry, I glue on the back and a piece to fill in the top shelf.
 When dry, I use Tim's tape to decorate the edges all round to hide my joins.
 Here are my 3 towers.
 This is the back.
 Here you can see the deep shelf to house my re-inkers at the top.

Please tell me if these measurements are up the spout or if my instructions are not clear...  This was hard to explain, thankfully I think my photos help...

Friday, 13 November 2015

Finnabair Over Emotional class

I know this post has been a long time coming...  Life got in the way! It is hard to believe that this photo was taken 2 weeks ago!

We booked this event way back in January.  Then we found that a total of 9 Capetonians were going up and so we got together as often as we could to craft as a group to get to know each other better and called ourselves the Finnaberries!  (We found more Capetonians when we got there... it was nearly a take over!)
Finally the day dawned and I took a road trip up to Jeffrey's Bay with a friend called Jo (seen above looking bright eyed and bushy tailed at 6am!) to join 5 other Finnaberries to do a class with Finnabair.

Two of the Finnaberries did the class before us on the Thursday and Friday... We managed to catch them for a photo when we arrived in JBay

The event was everything I had hoped for and more.

 We were spoiled with gifts on our tables from the Scrapbook Studio who hosted the event.  Here are the various things set out on my guest house bed below:


Here are the 3 Basson girls (not related, unless you consider that distress inks run in our veins...) all in the same room, brought together by Anna from Cape Town, Secunda and JBay.  It was a really special moment.
  This is Patricia Basson with her Finn style headband!  We have been online friends for a long time, so it was lovely to finally meet in person!
How awesome is this kit we got to build our canvas from?
Here Anna is showing us how to make the drips.
  What would an event be without some retail therapy?
  In my element!
 Off to make my drips on the canvas... looking a little sad as the day was coming to an end.
 The Finnaberries in the aprons I made for each of us and Anna
 I was put under the teacher's nose... I think that was to keep me good!
Here is my finished canvas
 Day two was taught by Cariena and Jowilna
Jowilna taught us lots of lovely tips and tricks and I even managed to stick to the page layout and finished a page as it should be... well, almost! 

Cariena had us playing with Zig markers to colour stuff.  Well I clearly had lots of fun in this class!

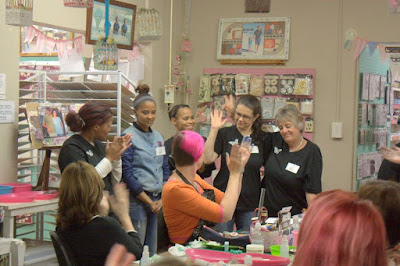
 This is the awesome team behind the event.  They work tirelessly to make sure that it all runs smoothly.  They are truly fabulous!
Thanks to Precilla and her camera, I actually exist in photos.... a rare occurrence and much appreciated!

Monday, 19 October 2015

My attempt at a Finnabair canvas


Hi there

I am attending a class by Finnabair in two weeks time at the Scrapbook Studio in Jbay, here in South Africa!  I am counting the sleeps!  However I am known for not sticking to the class and did not want to be distracted in this class so needed to get this out of my system!
I know we are doing the emotional class and so I did some searching of her images and found this one which I liked....
I decided to try it for myself at home to see what I could achieve so that when I am in class I can ask questions based on what I have discovered.

I drew some lines on the canvas for me to follow with a glue gun.  I started at the bottom of each drip and made a blob and then drew up the drip.  I heated it with a heat gun to melt the line a bit more and make the drips softer.

Then I added a piece from my dead printer which I took apart which you can see here just below the heart!
Using a stencil I put some texture paste at the base of the canvas as well as the top, while this was drying I used the Finnabair gold crackle medium on a clear two part heart which was a DIY Christmas ornament...
I laid out the cogs and flowers from my stash of embellies...  The worst is having to glue it all down once you have it where you want it!  I used half a tube of B7000 glue!
Then waiting for the glue to dry!  Which thankfully doesn't take long with this stuff!

I completely cheated (I don't have black gesso) and sprayed the whole canvas with black spray paint and added some black acrylic where the spray could not get to.


Once that was dry I clipped the surface of the drips and flowers etc with some Viva Gold (orange gold).

Here is a close up of the heart area so you can see the detail.  The brown shimmer you can see is also a Viva Gold paint called Kakao which I added to the background and to some embellies to create a shadow.
Maya Gold Coco is a silky gloss effect, water based paint with an intensive metallic color depth.      Impact resistant     Quick drying     Highly pigmented     Smudge and weatherproof     For absorbent and non-absorbent surfaces including polymer clay and fabric.  Available in 24 shimmery colors!  Poly Clay Play carries Viva Decor Products you will love!:
It has quite a brown/red shine to it once on your project.

Wednesday, 30 September 2015

What's on my Workdesk Wednesday? 3.5m Airship

Well in truth it is not on my desk, but in my car port!  It is however for Truth!  Truth Coffe!  The place Tim Holtz went mad for when he came to South Africa last year!

Here is how it started.

I started with some hoopla hoops, electrical conduit and cable ties.

Then used packaging tape to hold the ends together.  Added the vuvuzela for a nose cone and tested the heavy metal fan I had bought as a prop.  Had to can that idea as it was too heavy and I could not attach it safely to the structure.

Here she is half covered with her fabric skin.

Then I painted her

And added a fluorescent strip light, McGuyver style!

she flies!

And even glows in the dark!

Here I am making the prop and the huge cogs which will be on the wall behind her.

This is what will hang under her... It is the top half of Truth's building.
Here are the finished "wing like" stabilizers modeled on their logo and the finished prop.

Now I have to put this all together and do her final coat of paint and add cogs...

Only the weather is horrid, nothing is drying, so I am waiting for better weather to continue.

So that is me this week!