Showing posts with label airship. Show all posts

Tuesday, 18 May 2021

Anne's framed Airship


Hello dear Reader


Today I have Design Team Member Anne Redfern's gorgeous frame with the airship for your inspiration....

But Anne has prepared a blog post for you with step out photos which you can find here:

https://bollyanne.blogspot.com/2021/05/belinda-basson-dt-stamperia-airship.html

Please pop on over there and leave her some love!

Thursday, 4 February 2021

Tunnel Card instructions by Shamela


TUNNEL CARD

Lady Vagabond by Shamela aka Craftigal

REQUIREMENTS:

2X A4 250GSM WHITE CARD

2 STRIPS OF WHITE OFF CUTS APPROX 5.25’ X 0.75’

SBBS25: SIR VAGABOND 8X8  ( 1 SHEET)

DFLDC27 LADY VAGABOND DIE CUTS

SBBS27  LADY VAGABOND  8X8  BACK COVER SHEET EMBELLISHMENTS (LADY & CAT)

ABBREVIATIONS: DP - DESIGNER PAPER.


INSTRUCTIONS:

STEP 1: CUT  2 PIECES OF WHITE CARD TO 5.5’ X 5.5’. THIS IS YOUR BACK BASE AND THE FRONT OF YOUR CARD.


STEP 2: CUT 2 PIECES OF CARD TO 5.5’ X 3.5’ (B)

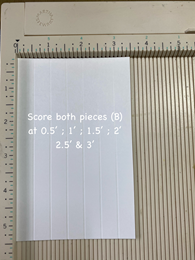
STEP 3:  SCORE YOUR (B) PIECES AT 0.5’ ; 1’ ; 1.5’ ; 2’ ; 2.5’ AND  3’.


STEP 4: CREATE A CONCERTINA/FAN BY FOLDING THE SCORE LINES INTO VALLEYS AND HILLS. IT SHOULD LOOK LIKE THE IMAGE BELOW.


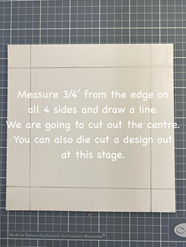
STEP 5:   CREATE THE FRONT FRAME OF YOUR CARD BUT MEASURING 0.75’ ON ALL  4 SIDES AND DRAW LINES AS SHOWN. YOU WILL NOW REMOVE THE CENTRE PANEL TO CREATE A FRAME.


STEP 6: USE DISTRESS OXIDE IN STORMY SKY AND SHADE THE TOP OF YOUR FRAME.
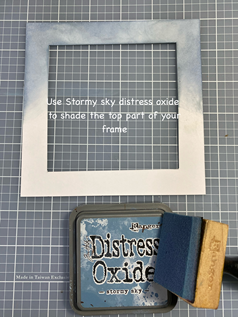
STEP 7: STAMP SIR VAGABOND WTKAT15 ON THE TOP OF YOUR FRAME WITH THE SAME INK.

STEP 8: ATTACH THE ONE CONCERTINA  (B) TO THE SIDE OF YOUR BACK BASE (A). MAKE SURE THE JOINER IS FACING TOWARDS THE INSIDE OF YOUR CARD.  DO THE SAME ON THE OTHER SIDE. WE WILL BE COVERING ITHE BACK WITH DESIGNER PAPER TO COVER.


STEP 9:  FUSSY CUT YOUR DP AS SHOWN BELOW.


STEP 10:   FUSSY CUT THE REST OF YOUR DP AS SHOWN BELOW


STEP 11:   REMOVE APPROX 1 7/8’ FROM THE LEFT SIDE OF THE TOP PIECE OF YOUR DP.


STEP 12:  TRIM APPROX 0.5’ OFF THE RIGHT SIDE OF THE SAME PIECE.

STEP 13: TRIM APPROX 2’ OFF THE TOP OF THIS SHEET.


 STEP 14: GLUE INTO YOUR BASE AS SHOWN BELOW


STEP 15: USE STORMY SKY DISTRESS OXIDE AND SHADE IN THE EXPOSED AREA ON    YOUR BASE CARD


STEP 16:  ALIGN NEXT PIECE OF DP AND TRIM DOWN TO SIZE. MAKE SURE THE PATTERN MATCHES UP

STEP 17: DO THE SAME WITH THE LAST PIECE OF DP.


  STEP 18: I USED 2 STRIPS TO ATTACH MY LAST 2 PIECES

STEP 19:  ATTACH THE WHITE STRIP APPROX 1.75’ FROM THE BOTTOM OF YOUR BASE. ON THE FIRST STEP OF YOUR HINGE (B). MAKE SURE IT IS EVENLY ATTACHED AND DOES NOT TOUCH THE INSIDE  EDGE OF YOUR HINGE.


STEP 20: ATTACH 2ND STRIP APPROX 0.5’ FROM THE BOTTOM OF YOUR BASE. GLUE TO THE NEXT STEP ON YOUR HINGE. MAKE SURE YOU LINE UP THE PATTERN SO THAT IT MATCHES PERFECTLY.


STEP 21: GLUE YOUR FRAME TO THE TOP OF YOUR HINGE. PLEASE REMEMBER TO ONLY ADD GLUE TO THE SIDES. THE TOP OF YOUR FRAME HAS TO REMAIN CLEAR OF ADHESIVE TO MAKE SURE YOUR CARD WILL BE ABLE TO FOLD FLAT FOR POSTING.

STEP 25:  FINALLY EMBELLISH WITH FINAL PIECE OF YOUR DP AS SHOWN AND ADD YOUR DIE CUTS  (DFLDC27) AND IMAGES CUT FROM THE LADY VAGABOND 8X8 DP (SBBS27)


Thursday, 28 January 2021

Tamar Perry creates a mixed media canvas with Lady Vagabond


Dear readers

Today I have the story from Tamar as to what inspired her to create this large mixed media panel of multiple items assembled together... called

 “Glimpses of NY”

As you know, New York is the home of Sir Vagabond, and also the home of the creator of this piece *wink*

From the outside, New York seems shiny to dreamers but to the locals it is dirty, dark, busy and very grey.


In her travels, Lady Vagabond only read about this great city, but when she finally arrived in her flying house to New York,  all she could see from above was the grey blanket of smog that covers the city, and she could barely catch glimpses of it through the cracks in the industrial cloud of what is one of the greatest cities in the world. 

To make this piece I used pieces of chipboards from my stash of leftovers, in various sizes.


I treated each one as a separate substrate, and crated mini pieces of art – some with rice paper, some with paint, some with stencils or stamps, or a combination. 


When all the parts were finished I assembled them together and attached them to each other.


Using the the molds that illustrate Lady Vagabond's world, I gave the flying machine bigger wings because this is New York and everything is bigger here, however one of its wings is a bit 'damaged '– as it was a long way to come from London though all weathers over the ocean.


I added the molds spread out over the assembly and not on top of each other to illustrate the glimpse from Lady Vagabond world hovering over the glimpses of New York.  The only colorful components in this piece are Lady herself and her books in which she can let her imagination take flight!

Regards

Tamar Perry


Tuesday, 5 January 2021

Light up Airship Canvas for My Design Team

Dear Reader

Welcome to the first post of 2021!  May the year ahead be a healthy and happy one for us all!

I am starting off the year as the first person to post for my Lady Vagabond Design Team.  I 'm excited to share that there will be a YouTube hop starting on the 15 January and running until 31 January with 5 Pizza box prize winners being announced on Thursday 4 February on the Facebook Stamperia Cafe.

Yes, you read that right... 5 people will stand the chance to win a pizza box filled with Stamperia products by commenting "which country and city they live in" on the 9 videos in the hop and liking each video.... as easy as that!

You will be able to see how I made this standing canvas with lights in this hop, but for now, I will show you the photos of the canvas and give a brief explanation.

This is the back in the photo below with the little light switch and battery pack hidden at the bottom right hand corner...

A side shot to see the dimension I created by using fun foam under the fussy cut layers.

In this photo you can see the cardstock gear I cut on my Brother Scan n Cut shining through the rice paper that I put on acetate over the reverse side of the canvas.

As always, I like to balance my project and I have the large airship off the left hand side of the canvas, so I have put the badge off the bottom right hand corner and of course, there are 3 airships to make sure that there are an ODD number of items to keep your eye moving around the canvas.  

I cut a drop shadow for the large airship on my Brother in black cardstock and then added fake drop shadows on the other items on the canvas with some paint.
For the Sir Vagabond little airship, I used a half a Christmas ornament to give it dimension and aged it with Allegro paints to help it blend into the canvas a bit more.  I also put a clear "bubble" over the little clock on his airship under the half ornament for added interest.  In this close up shot you can also see the brads that I added to the lock as well as the drop shadow on the left hand side of the lock.
This is a different angle of the built up airship so that you can see the dimension of the bent paper.