Tuesday, 30 March 2021

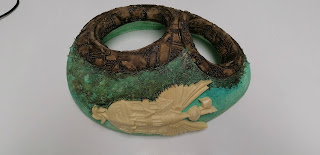
Giant Lady Vagabond Egg by Belinda Basson


Dear Reader
Today it is my turn to share how I made my Lady Vagabond Egg as my Design Team post!

Below is a photo of all the main products I used, but I have listed them all at the end of this post.
I started with gesso and then while it was still wet, I pressed the crackle stamp into it to create texture.
Then I rolled out the Soft clay and pressed the texture impression sheet into it and cut the circles out.
I gathered up all the left overs and sprayed them with water and layered them all together, then rolled them out again, added the same impression sheet and cut them into strips to glue into the window.
I painted around the airship on the rice paper with water and tore out the ship.  Using Mix media glue, I adhered it to the egg.
While that was drying, I applied some Texture sand paste with my finger.
When it was all dry, I painted it with the allegro paints and Aquacolors.
I added the soft resin airship to the side and coloured it with alcohol inks.
To see the fast 12 minute video of how I created this from start to finish, you can click HERE

Products used 30cm tall egg from local craft shop Gesso K3P08N Texture Sand Paste K3P40 Mix Media Glue DC28M Soft Clay K3P44 Allegro Turquoise KAL25 Allegro Orange KAL08 Allegro White KAL11 Jewel Alcohol ink Turquoise KAD09 Jewel Alcohol Ink Blue KAD011 Jewel Alcohol Ink Brown K87AD012 Aquacolor Leather KAQ004 Aquacolor Aquamarine KAQ015 Moulds: Airship and lady:K3PTA4 Light bulb K3PTA486 Texture Impression sheet: K3PTA545 wings: KACM06 Big bubbles SBA398 Brads SBA402
Crackle stamp WTKCC183


Thursday, 18 March 2021

Hadry's Three Dimensional tag


Dear Reader

This is the fabulous three dimensional tag that Hadry created using Lady Vagabond chipboards, papers and the new clear printed acetate sheets.


The brads on the hinges look fabulous.

The Chipboards were painted with the Allegro paints and they look so old and textured under this acetate. 


Thursday, 11 March 2021

Shamela Hendricks made this elegant cupboard


Dear Reader

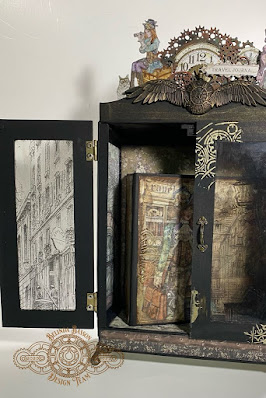
Today it is Shamela's turn to inspire you with her Lady Vagabond cupboard to house the mini album inside.

I love this group of chipboards that she put on the top to decorate it as well as all the moulded pipes and lights on the side.


The glitter in the Crystal resin looks amazing in this light bulb.


This is the A4 printed acetate that Shamela used in the doors.


Tuesday, 9 March 2021

Olga Heldwein's boat ballon

Dear Reader

Today is Ola Heldwein's turn to inspire you with this awesome Balloon Boat:

My boat obsession continues this time I made Hot air balloon with boat base as mood light.

It looks lovely in set up . Hot air balloon is made from tissue paper and it incorporates Lady Vagabond rice papers sewed into balloon base with some velum for sturdiness.

Inside we have string of fairy lights and when lit up it gives a nice subtle glow to whole space around. Base is built up from chipboard covered with paper scraps from 12x12 papers. Molds add a steampunk vibe to whole piece . I really appreciate fact that the collection is called Lady Vagabond you can use it to make also more masculine or neutral pieces .


MATERIALS
https://stamperiab2b.com/shop-by-category/scrapbooking-papers/classic-scrapbooking-pad-12-x12/3688-scrapbooking-pad-10-sheets-cm-30-5x30-5-lady-vagabond
https://stamperiab2b.com/shop-by-category/moulds-and-reproduction-products/moulds-a4/3730-soft-mould-a4-lady-vagabond-fly-machine
https://stamperiab2b.com/shop-by-category/rice-paper/rice-papers-a4/3716-a4-rice-paper-packed-lady-vagabond-london

Thursday, 4 March 2021

Mixed Media canvas by DT member Dawid


Dear Reader

Here is Dawid's first creation for the design team using Lady Vagabond rice paper and moulds.

The angel face you can see here is from the Door plate mould.
I love all the texture he has created by using stencils , then layering up with chipboards and moulds.
This is the mans face at the bottom of the door plate mould and I love all the gears that he has used below him.


Wednesday, 3 March 2021

Mysterious world caught in a Time Machine


Dear Reader

This is a project I created using a long list of products (I have added it at the end of this post) where I just played and experimented using my favorite game... WHAT IF...

I created a super speedy version of my 3 hours (or more) of playing here: https://youtu.be/ArSTjiDzvx8

Below you can see the 14cm plastic Christmas ornament covered with the Allegro paints mixed with Pouring medium...  


I cleaned the ball pieces with alcohol and then applied a coat of part 1 Crackle Vetro on the outside of the halves and let this dry.  I used this to help make the paint stick.

Allegro Bianco KAL11
Allegro Nero KAL 103
Allegro Terra d'Ombra KAL106
Allegro Mattone KAL20
Allegro Turchese KAL25
Allegro Arancione KAL08

I mixed 5 (not including nero) allegro paints with the Pouring medium in ratio: 1 part water, 1 part paint and 1 part Pouring medium.  I gave all the colours except white 3 drops of silicone and poured them all into the white cup.  This was then poured over the dome.

When this was dry, I sprayed the inside of one dome with the Mirror mist and the outside of the other one.  

To create this I used the Pizza box as a base which I covered in primer.  I then used two sheets of the A3 clocks around the edges which I crunched and then glued on to give a more weathered look.

I glued the 12x12 London map on the back of the box  
The half ball with the mirror mist on the outside, I covered with the London map rice paper and added the printed metal strip and lock from the 12 x 12 paper pad.

I cut the clock out of the paper sheet and glued the mechanical acetate A4 sheet behind it.  I cut the same size circle in the lid of the box.  I then glued on the paper and cut the door out of the box.

I cut the same circle out of the small 8x8 London map paper to put on the inside of the door, ready for later.

I painted the inside of the door with the white Allegro and Vicace Oro paint using a dry brush. I also painted the clock from the Cuts and Scraps and some of the gears at the same time for inside the one half of the ball.  I also used this technique on the base of the inside of the box that could be seen when standing open.

While I had the paint out, I dry brushed the white over the rice paper round the edge of the box to give it a worn aged look.

I put the Arhip sheet inside the box as a background using double sided tape

I glued the painted gears and clock inside the dome with the rice paper on as well as the Lady sitting on the box from the sticker sheet.and added the goggles sticker to the inside of the mirrored dome.

I poked a hole in the door to put the ring fastener in.  (the ring and the round plate were removed from it.) I placed the rice paper dome on the outside of the acetate and the other one on the inside and used the ring fastener to join them together.

I glued the small London map sheet in place on the inside of the door and cut the top so that the dome could turn.  To hide the "legs" of the fastener, I added a painted gear.

For the finishing touches I added the left over stickers to the outside of the box, using the two hinges back to back as a handle and to stop the door falling into the box.  So that the stickers stood out from the background paper, I watered down some nero Allegro paint and gave them a drop shadow.


I have used:
The Pizza box as a base
Pouring medium KE45
Crackle Vetro Part 1 KE18P
14cm ball KB01BSQ
Lady Vagabond 12x12 paper pad SBBL82
Lady Vagabond 8x8 paper pad SBBS27
Chipboard stickers Lady Vagabond DFLCB18
A4 clear background sheets SBA408
76 Alcohol KE53
Mirror Effect KE51
Rice paper DFSA3084
Rice paper DFSA4522
Allegro Bianco KAL11
Allegro Nero KAL 103
Allegro Terra d'Ombra KAL106
Allegro Mattone KAL20
Allegro Turchese KAL25
Allegro Arancione KAL08
Vivace Oro Zecchino Metallico KAB87
Mixed Media Glue DC28M
Extra strong glue DC07GN
Primer K3P29G
Cuts and Scraps KLSPDA412
Ring fasteners SBA400