Hello there fellow Tim-a-holic, welcome to my first version of Tim's Tattered flower challenge!
I saw Tammy Tutterow's blog on how to make vintage flowers and because I could not find the crinoline anywhere, I decided to try her same concept without the color wash sprays using paper and different fabrics instead to see what effects I could get.
I put them on quite long florist's wire covered in green florist's tape and then used my stack of Tissue tape rolls as my vase! Now I have a lovely feature on my desk!
I could not stop at these three and made another one which is in my next post here!
Thanks for the visit.
Bella
Saturday, 16 March 2013
Tim's Tattered Flower Challenge - my version No2
Hello there fellow Tim-a-holic, welcome to my second entry into Tim's Tattered flower die challenge. I have been sitting on the fence with this challenge as there is just so much one can do with this die. I have used it so many times to make different flowers that my mind was spinning as to which style to make to enter. In the end, I made two projects and will enter both. So this is project 2.
I made the canvas by covering the 12"x 12" base canvas with tissue paper and the 4 mini canvases with dictionary paper then randomly adding gesso. While the gesso was still wet, I sprayed it with Colour wash in Stream and Heirloom Gold Perfect Pearl Mist.
Once the base was done, I added my embellies consisting of plaster board tape, tile spacers(xxx), game pieces and the key hole together with wire and bling. I cut the Hardware findings from grunge board and covered it with Tarnished Brass Distress Stain. The silk flowers and burlap ones were bought from my local scrapbook store and the main feature flower I made as with Tim's Tattered flower die follows:
Tammy Tutterow has the most amazing step out set of photos and explanations on how she made vintage looking flowers using cotton crinoline. I went off to every fabric shop in town and could not find it here in Cape Town South Africa so I bought fabric stiffener which is nylon... I die cut the layers, two of each flower and sprayed them with the Stream Color wash, then I layered them all together with the brad and blow dried it with my Ranger heat tool which gets VERY hot. Using tweezers to hold the flower, I held the front of the heat tool really close to the edges of the petals on purpose so that they melted and curled up.
Thanks for the visit, Hope you liked my version of Tim's Tattered Flower!
Bella
I made the canvas by covering the 12"x 12" base canvas with tissue paper and the 4 mini canvases with dictionary paper then randomly adding gesso. While the gesso was still wet, I sprayed it with Colour wash in Stream and Heirloom Gold Perfect Pearl Mist.
Once the base was done, I added my embellies consisting of plaster board tape, tile spacers(xxx), game pieces and the key hole together with wire and bling. I cut the Hardware findings from grunge board and covered it with Tarnished Brass Distress Stain. The silk flowers and burlap ones were bought from my local scrapbook store and the main feature flower I made as with Tim's Tattered flower die follows:
Tammy Tutterow has the most amazing step out set of photos and explanations on how she made vintage looking flowers using cotton crinoline. I went off to every fabric shop in town and could not find it here in Cape Town South Africa so I bought fabric stiffener which is nylon... I die cut the layers, two of each flower and sprayed them with the Stream Color wash, then I layered them all together with the brad and blow dried it with my Ranger heat tool which gets VERY hot. Using tweezers to hold the flower, I held the front of the heat tool really close to the edges of the petals on purpose so that they melted and curled up.
Thanks for the visit, Hope you liked my version of Tim's Tattered Flower!
Bella
Wednesday, 13 March 2013
What's on My Workdesk Wednesday 197? Roses, Roses and More Roses!
Yes fellow Wednesday desk hopper, everything is coming up roses on my desk this week. My order for 40 plus roses is due today and seeing as I work best under pressure, I am still cutting and rolling the last 20 this morning...My machine is going great guns in the background while I am typing this!
Here is my desk as it progressed last night!
They still need their bases glued on so that they don't come apart when someone picks them up and I must make another 12 small ones. The little petals you can see in the left hand corner in yellow and orange are the original ones done with the punch. I still need to cut 24 of those strips to make up the last of the order as each rose takes 2 overlapped strips...it is 7:30am as I write this and they need to be done and dusted by 9:30! No pressure...!
I will desk hop from the launch pad at Julia's place as soon as I come up for air!
See ya later.
Bella
Wednesday, 6 March 2013
What's on my Workdesk Wednesday 196? Roses and photos
Hello there fellow Wednesday desk hopper! Nice to have you at my desk over in Cape Town South Africa! The relax, laugh and peace are back up in place with mirror tape this time, not the sticky putty stuff that melted in the heat...the drawers are still waiting for their pretty knobs...one thing at a time!
Today I have some photos I printed from my Hubby and son's recent week-end spent with family at a gathering 7 hours drive from here. I could not go with due to work commitments, but have enjoyed living vicariously through the photos and bbm messages I got along the way. Technology is fabulous. The top photo is of all the cousins, well 6 of the 9 anyway...the younger lot.
I also have the beginnings of an order for 40 paper roses on my desk. You can see the ones already done and glued at the back of my desk and then the piles of already prepared curled petals in cream and gold as well as the white pile that still needs prepping...the red ones are yet to be cut! it takes 1 and a half sheets of Bazzil to make one rose! I have my work cut out for me! Excuse the pun!
So that is what is happening on my desk, now I am off to see what you are doing on yours if you have linked up over at Stamping Ground where Julia valiantly hosts 150+ peeps every week!
Thanks for the visit
Bella
Today I have some photos I printed from my Hubby and son's recent week-end spent with family at a gathering 7 hours drive from here. I could not go with due to work commitments, but have enjoyed living vicariously through the photos and bbm messages I got along the way. Technology is fabulous. The top photo is of all the cousins, well 6 of the 9 anyway...the younger lot.
I also have the beginnings of an order for 40 paper roses on my desk. You can see the ones already done and glued at the back of my desk and then the piles of already prepared curled petals in cream and gold as well as the white pile that still needs prepping...the red ones are yet to be cut! it takes 1 and a half sheets of Bazzil to make one rose! I have my work cut out for me! Excuse the pun!
So that is what is happening on my desk, now I am off to see what you are doing on yours if you have linked up over at Stamping Ground where Julia valiantly hosts 150+ peeps every week!
Thanks for the visit
Bella
Friday, 1 March 2013
Tim's March tag of 2013
This is always my favourite day of the month, I look forward to the 1st like a child does to Christmas, only I get a treat every month! Tim has posted his tag for March and as usual, none of his CHA January releases have hit our shops yet so I don't have half the supplies he has used and have improvised greatly!
Instead of his printed paper, I decided to try an idea I had in my head since the distress paints are not yet available...I have used paint dabber mixed with Distress ink re-inker and water to make my background for the tag and here is a photo of the craft sheet before and the 5 tags I made with it...I get almost the same look as the distress paints, only it is not water safe when dry...the distress inks still re-activate, but hey, this will do for now...my order for distress paints is in!
I Then used the Martha Stewart 5 blade scissors instead of his die to make my grass which I streaked with paint dabber.
The butterfly is the only appropriate spring type mover and shaper die that I have so I used that and instead of tinsel, I used double sided tape and glitter.
Again, I had to use my own sentiment stamp as the yummy ones of Tim's are just not in my hot paws yet! To make the tattered ribbon stand out a bit more, I added some paint dabber to that too.
I used the paper roses from my stash and brushed them with the Distress ink called Worn Lipstick which is what I also used for the bow round the butterfly.
Oh me, oh my, Oh Happy Day, I loved making this tag!
Thanks for visiting.
Bella
Instead of his printed paper, I decided to try an idea I had in my head since the distress paints are not yet available...I have used paint dabber mixed with Distress ink re-inker and water to make my background for the tag and here is a photo of the craft sheet before and the 5 tags I made with it...I get almost the same look as the distress paints, only it is not water safe when dry...the distress inks still re-activate, but hey, this will do for now...my order for distress paints is in!
I Then used the Martha Stewart 5 blade scissors instead of his die to make my grass which I streaked with paint dabber.
The butterfly is the only appropriate spring type mover and shaper die that I have so I used that and instead of tinsel, I used double sided tape and glitter.
Again, I had to use my own sentiment stamp as the yummy ones of Tim's are just not in my hot paws yet! To make the tattered ribbon stand out a bit more, I added some paint dabber to that too.
I used the paper roses from my stash and brushed them with the Distress ink called Worn Lipstick which is what I also used for the bow round the butterfly.
Oh me, oh my, Oh Happy Day, I loved making this tag!
Thanks for visiting.
Bella
Wednesday, 27 February 2013
Whats on my workdesk Wednesday 195? Relax, Laugh and Peace!
Hello fellow Wednesday desk hopper, welcome to my desk over in Cape Town, South Africa.
I finally climbed up onto my desk and found the words that had slid off the wall in the heat down behind the back of beyond... now I must go and get some mirror tape to stick them back above my desk.
At the back of my desk you can see my name tray that I was inspired to make by fellow WOYWWer Minxy who put one on her Face book page
And here is mine up close:
Then just in the top of my desk picture, you can see the bottom of a comic I printed off Paula's blog that she found here at Hyperalergic which I thought was so very me...especially the last two blocks! Like the artist was in my head!
So that is me for this Wednesday. Now I am off to Julia's blog to see if you have linked up and are joining in the fun of the world wide desk hop and snoop!
Thanks fro the visit
Bella
Sunday, 24 February 2013
I was inspired!
Thanks to Minxy I was inspired to go to my desk and create!
She posted on Face Book yesterday and though it took me a while to get to make my project (as I had to finish 6 birthday cards for orders first), I finally treated myself to a little inky time...
Here is her project that inspired me, though it is not on her blog, here is the link for more inspirational porjects: http://thealteredinker.blogspot.com/
Here is mine. My word stand was purple plastic so it just begged to be altered!
I used Sticky backed tin foil tape and black alcohol ink to change my plastic into an industrial looking version.
Bella
Wednesday, 20 February 2013
Everything is coming up Roses!
Since I got the punch yesterday I have not stopped making roses...I have a whole posy going now! They are such fun and are so quick to make.
All I have to do is cover the skewer sticks with florist's tape and they are done!
Bella
What's on my Workdesk Wednesday? 194 Roses
Hello fellow Wednesday desk hopper! Welcome to my desk in Cape Town, South Africa!
I had a serious case of room shrinkage due to...well I am not entirely sure what, but I got seriously fed up with it on Saturday after my class and did a MAJOR clear up and re-organise, including restructuring and painting of some furniture! To see the before and afters go here
This is my room of stash this morning and yes the word Relax is relaxing slowly off my wall above my desk...I need to go get some mirror tape (along with new glitzy handles for my re-purposed bedside tables now residing under my desk) from the hardware store.
The photo at the top of my post with the roses on the black canvas is what is still there from creating this step out series last night on how to make a rose from a punch. I think you can read the instructions if you click on the photo, it should enlarge enough.
This is the dining room table at my friends house where we meet once a month for a creative something or other and chin wag. We usually pick a theme like stamps, embossing folders, punches or dies and all bring our stash with and swap so we take home some new ready made things to play with. This Monday it was die cutting and so we have called our little group the BOND girls as we all now have Vagabonds and we die cut up a storm. The plastic bag on my desk to the left of the first photo is what I cut with their dies.
So now I am off to see what is on your desk if you have linked up with Julia on her blog over at Stamping Ground where she valiantly hosts us every week.
Thanks for the visit.
Bella
Saturday, 16 February 2013
Harmony Restored before and after shots!
I had not planned a full on clean up today, but some how one thing lead to another after coming home from teaching this morning's card class for my friends birthday party...I needed to put all my stuff away from the kit trays and barely had enough space on the temporary folding desk to put them down, let alone unpack them!
I have been unhappy with the chaos in the study/studio for quite some time but have been flying at full tilt just to keep up with classes, card orders and the like so cleaning up was not a priority!
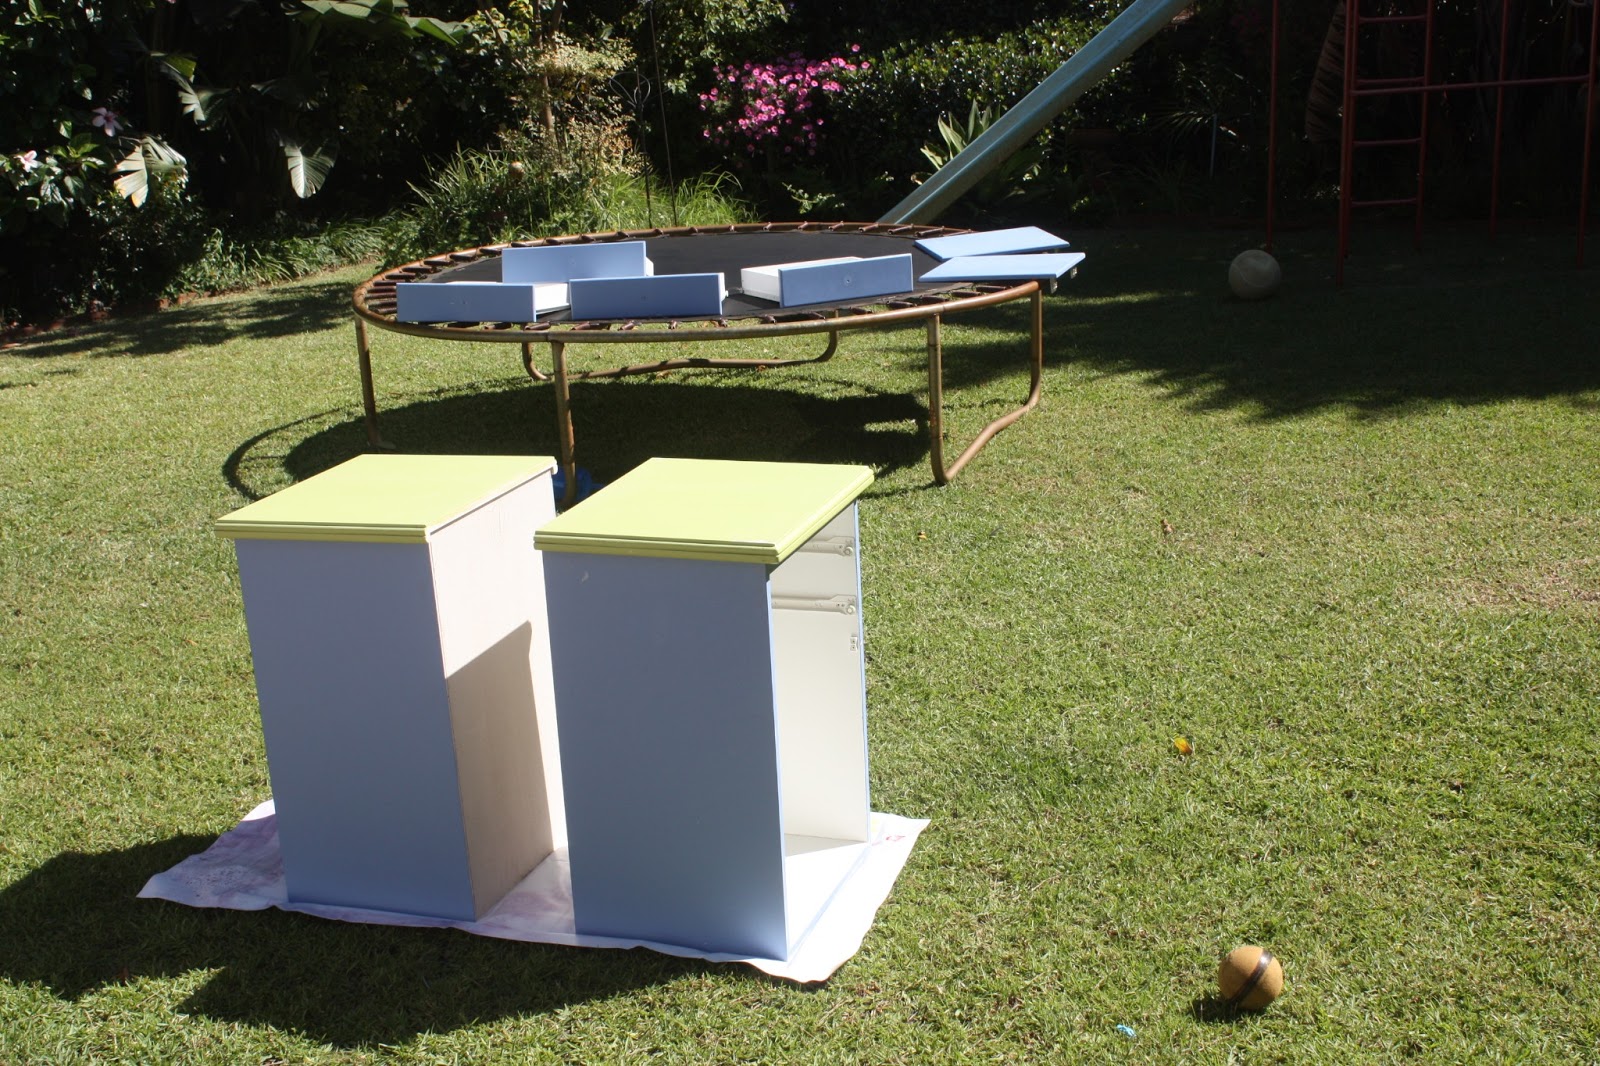
I found myself thinking that the little cupboards that had once been our bedside tables in cornflower blue and green would look much better white and so I set about unearthing them from behind the temporary (read permanent for the past few months) table and from under the boxes and general stuff on top of them.
I also then realized if I took the base off them they would fit under my existing desk which is just full of stuff...then they would be more accessible and I would use the stash in them more often.
So the bases and knobs came off and they got painted white! I am going to get them some lovely clear glass knobs on Monday.
I am now short of surface space for a few things like the 2 albums and 2 boxes that are stacked at the end of my desk, but I need to go through the large drawer and cupboard under them...maybe they can go in there...time will tell..tomorrow
So here are the before and after shots and yes it is now dark outside as it is 9pm! Wowza! This has all taken since 1pm to do. I have such respect for those peeps who do those make over programs on TV! I know they have crew to help etc but my word it is not a speedy process!
My washing basket that holds my exercise ball has to live in the corner in front of the now folded and back to temporary table. I can now also see out my lovely concertina doors to the garden!
Thanks for the visit
Bella
I have been unhappy with the chaos in the study/studio for quite some time but have been flying at full tilt just to keep up with classes, card orders and the like so cleaning up was not a priority!
I found myself thinking that the little cupboards that had once been our bedside tables in cornflower blue and green would look much better white and so I set about unearthing them from behind the temporary (read permanent for the past few months) table and from under the boxes and general stuff on top of them.
I also then realized if I took the base off them they would fit under my existing desk which is just full of stuff...then they would be more accessible and I would use the stash in them more often.
So the bases and knobs came off and they got painted white! I am going to get them some lovely clear glass knobs on Monday.
I am now short of surface space for a few things like the 2 albums and 2 boxes that are stacked at the end of my desk, but I need to go through the large drawer and cupboard under them...maybe they can go in there...time will tell..tomorrow
So here are the before and after shots and yes it is now dark outside as it is 9pm! Wowza! This has all taken since 1pm to do. I have such respect for those peeps who do those make over programs on TV! I know they have crew to help etc but my word it is not a speedy process!
Before, view from the door ( yes the wording is melting off the walls in the heat...I need to get mirror tape...and find the words that have gone down the back of my shelves...)
Before view of the temporary desk and under my desk.
Before view of the two bedside tables
During view of the chaos
The bedside tables about to be painted.
A view of my room during the process from the garden
After view from the door (yes the words are still missing...I have not had the time or energy to hunt them down behind the shelves...that's tomorrows job!)
After view with the newly painted bedside tables under my desk
After view of the place the temporary desk and bedside tables had been.
After view from the garden
My washing basket that holds my exercise ball has to live in the corner in front of the now folded and back to temporary table. I can now also see out my lovely concertina doors to the garden!
Thanks for the visit
Bella
Subscribe to:
Posts (Atom)