I first met tim in 2009 back in South Africa. So officially thats when my addiction to and hoarding of all things Tim started... Just over 10 years ago... I've been lucky enough to do 4 classes with him in person as well as the amazing on line classes Creative Chemistry 101, 102 and 103 (worth every cent)
He was the first person to introduce me to Steampunk with a tag he created and I fell in love with it immediately so I went off to research the theme more. Thanks to Tim, Steampunk is my "go to" creative place and I have done so much with it since then... from installing a 2m x 4m art installation with 3.5m lit up airship in his favourite coffee shop ⇦(click on the link... it takes you to his blog post about the place) Truth Coffee Roasting in Cape Town, to another resteraunts decor over in Stellenbosch called Steam.
Having moved to Gemany at the end of March last year, I decided to join in with the tradition of decorating for Easter. Every shop I enter at the moment is full of Easter decor, but it is not in my style... I like vintage and Steampunk... so I set about creating an ode to Tim, Fin and Stamperia by creating a giant egg using their products and style.
This is the Tim stanza from my Ode. You can see the full ode and all 3 eggs ⇦ here(click link)
Tim showed me Steampunk
And fifty shades of grunge
I've enough idea-ology to fill a trunk
Into which I want to plunge.
And fifty shades of grunge
I've enough idea-ology to fill a trunk
Into which I want to plunge.
I used different book paper for each egg, but the same technique each time... tear up the paper into little pieces so they don't crease as you apply them and adhere with vintage Distress Collage Medium both underneath and on top of each little bit.


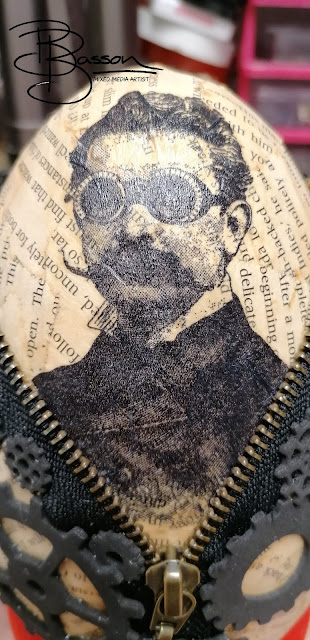
When the egg was dry, I pinned on the zip I found at a local flea market and the gears I had die cut in craft foam to give them dimension.
Using a tissue (one you use to blow your nose... a tip I got from my friend Olga Heldwein) I stamped the Professor onto it using Jet black Archival ink. I then cut him out with a slight halo and peeled off just the top layer of the tissue.
I tucked him into place and glued him on using the same vintage Distress Collage Medium.
He is now the same colour as the background and the tissue goes transparrent so you can't see the edge and you can see the writing from the book paper through his face.
Black soot Distress paint, applied with a brush is what I used to cover the foam gears and faded out the colour onto the rest of the egg so that you could still see the writing. You need to do this over the foam or the Treasure brass rub will not adhere well to the bare foam.
Using my finger, I applied the Treasure brass to the raised areas.
Raiding my "trunk" of idea-ology stash, I added some things to the back of the egg to balance the weight of the stuff in the front.
The fan on the top of the egg is one I ordered on line some time ago... I thought it would look good at the top of the egg... it made me think of the one on the stamp set with the Professor...
Below are various views of the egg...
I hope you enjoyed my ode to Tim!


Thanks for all the details & explanation- gorgeous!
ReplyDeleteFabulous egg, you've really inspired me to decorate some eggs this year. Thanks hugs Sue xx
ReplyDeleteBella, you are a true inspiration. Hugs, Angela xXx
ReplyDeleteHi Bella. Can I ask you what die you used to cut the craft foam. Thank you
ReplyDeleteSo steamylicious! What stories you must have about living all over the world.
ReplyDelete